Sony VPL-FX40L Operating Instructions - Page 27
To clear the menu, To reset items that have been, adjusted, Unadjustable items
 |
UPC - 027242710436
View all Sony VPL-FX40L manuals
Add to My Manuals
Save this manual to your list of manuals |
Page 27 highlights
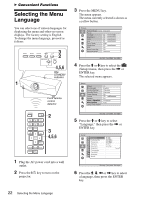
Adjustments and Settings Using a Menu Next menu window Setting items 4 Make the setting or adjustment of an item. • When changing the adjustment level: To increase the number, press the M or , key. To decrease the number, press the m or < key. Press the ENTER key to restore the previous screen. • When changing the setting: Press the M or m key to change the setting. Press the ENTER key to restore the previous screen. You can restore the previous screen using < depending on the selected item. To clear the menu Press the MENU key. The menu disappears automatically if a key is not pressed for one minute. To reset items that have been adjusted To reset the setting of the items, there are the following two ways. • Select "Reset" in the Picture menu. Do you wish to reset the settings to default values ? Select "OK" when the screen display appears. The following settings are reset to their factory preset values: The items that can be reset are as follows: "Contrast," "Brightness," "Color," "Hue," "Color Temp," "Sharpness," "DDE," "Black Level Adj.," and "Gamma Mode" in the Picture menu. • Press the RESET key on the Remote Commander. To reset the value of an item back to its factory preset value, press the RESET key while a setting item is displayed on the screen. Unadjustable items The adjustable items are limited depending on the input signals. The items that cannot be adjusted or set do not appear in the menu. For details, see page 38. Storage of the settings The settings are automatically stored in the projector memory when the ENTER key is pressed. If no signal is input If there is no input signal, "Cannot adjust this item." appears on the screen. Using a MENU 27
-
 1
1 -
2
-
3
-
4
-
5
-
6
-
7
-
8
-
9
-
10
-
11
-
12
-
13
-
14
-
15
-
16
-
17
-
18
-
19
-
20
-
21
-
 22
22 -
 23
23 -
 24
24 -
 25
25 -
 26
26 -
 27
27 -
 28
28 -
 29
29 -
 30
30 -
 31
31 -
 32
32 -
33
-
34
-
35
-
36
-
37
-
38
-
39
-
40
-
41
-
42
-
43
-
44
-
45
-
46
-
47
-
48
-
49
-
50
-
51
-
52
-
53
-
54
-
55
-
56
-
57
-
58
 |
 |
