Sony XAV C1 Instructions Manual - Page 36
Other settings — OTHER, OTHER
 |
UPC - 027242693678
View all Sony XAV C1 manuals
Add to My Manuals
Save this manual to your list of manuals |
Page 36 highlights
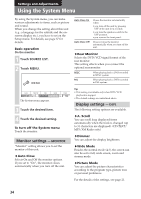
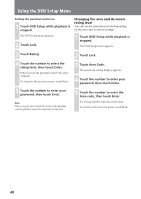
Using the System Menu Other settings - OTHER ♦AUX 3 You can set the function of the AUX3 jack. When you connect the back camera to AUX3 jack, set to "Back Camera". To adjust the position of the back camera while viewing the image of the camera, set to "Normal". Normal Back Camera • Select this when you connect the other components other than back camera to AUX3 jack. • Select this to test view while connecting the back camera. You can adjust the position of the back camera while viewing the image of the camera without setting the shift lever to the "R(reverse)" position. However, note that the image of the camera will be displayed only when the parking brake is set. Select this when you connect the back camera to AUX3 jack. ♦Switching the NTSC/PAL system You can switch the NTSC/PAL system of the back camera in the AUX 3 mode. Press and hold SEEK + of the main unit for 3 seconds while in AUX3 mode. The short beep sounds and NTSC/PAL system is now switched. NTSC Switches the back camera to NTSC system. PAL Switches the back camera to PAL system. ♦Demo Switching on and off the Demo mode. The Demo screen is displayed only when the power is off. Demo On Turns on the Demo mode. Demo Off Turns off the Demo mode. Tip The default settings are underlined. ♦Touch Panel Adjust If the touching position does not correspond with the proper item, you will need to adjust the touch panel position. Touch 1, 2 and 3 of the touch panel in order. 1 2 3 Note This setting is available also when AUX 3 is set to "Normal". ♦PBC On Switching on and off the PBC function of VCDs. Available only when VCD is stopped. PBC On PBC Off Turns on the PBC function. Turns off the PBC function. 36
-
 1
1 -
2
-
3
-
4
-
5
-
6
-
7
-
8
-
9
-
10
-
11
-
12
-
13
-
14
-
15
-
16
-
17
-
18
-
19
-
20
-
21
-
22
-
23
-
24
-
25
-
26
-
27
-
28
-
29
-
30
-
 31
31 -
 32
32 -
 33
33 -
 34
34 -
 35
35 -
 36
36 -
 37
37 -
 38
38 -
 39
39 -
 40
40 -
 41
41 -
42
-
43
-
44
-
45
-
46
-
47
-
48
-
49
-
50
-
51
-
52
-
53
-
54
-
55
-
56
-
57
-
58
-
59
-
60
-
61
-
62
-
63
-
64
-
65
-
66
-
67
-
68
-
69
-
70
-
71
-
72
-
73
-
74
-
75
-
76
-
77
-
78
-
79
-
80
-
81
-
82
-
83
-
84
-
85
-
86
-
87
-
88
-
89
-
90
-
91
-
92
-
93
-
94
-
95
-
96
-
97
-
98
-
99
-
100
-
101
-
102
-
103
-
104
-
105
-
106
-
107
-
108
-
109
-
110
-
111
-
112
-
113
-
114
-
115
-
116
-
117
-
118
-
119
-
120
-
121
-
122
-
123
-
124
-
125
-
126
-
127
-
128
-
129
-
130
-
131
-
132
-
133
-
134
-
135
-
136
-
137
-
138
-
139
-
140
-
141
-
142
-
143
-
144
-
145
-
146
-
147
-
148
-
149
-
150
-
151
-
152
-
153
-
154
-
155
-
156
-
157
-
158
-
159
-
160
-
161
-
162
-
163
-
164
-
165
-
166
-
167
-
168
-
169
-
170
-
171
-
172
-
173
-
174
-
175
-
176
-
177
-
178
-
179
-
180
-
181
-
182
-
183
 |
 |
