Symphonic CSHP80G Owner's Manual - Page 14
On-Screen Display for DVR Mode, Display Menu, Example :Advanced Menu, Setup Menu, General
 |
View all Symphonic CSHP80G manuals
Add to My Manuals
Save this manual to your list of manuals |
Page 14 highlights
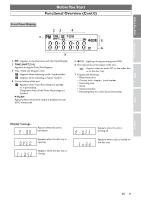
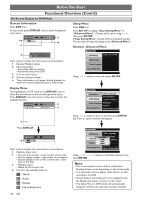
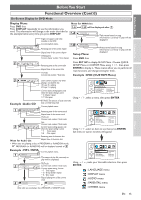
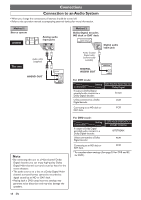
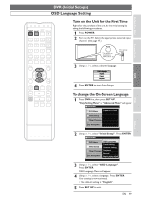
BeforeYou Start Functional Overview (Cont'd) On-Screen Display for DVR Mode General Information: Press DVR first. In stop mode, press DISPLAY once to show the general information. *1 * DVR MODE T 1 / 1 C 1 / 1 0:00:04 CH 12 M 3 Resume 4 Setup Menu: Press DVR first. Press SET UP to display "Easy Setting Menu" or "Advanced Menu". Choose either menu using / , then press ENTER. ("Easy Setting Menu" consists of those frequently needed. You can make all required settings using "Advanced Menu".) Example : Advanced Menu 2 DVR 20:56 CH 12 Advanced Menu DVR Menu Erase All in DVR Each section includes the information as listed below: 1 Resume Playback status 2 Recording status • Recording channel number • Remained time of the DVR 3 Current audio status 4 Current channel number * These information will appear during playback or when the resume playback point is memorized. Initial Setup Timer Program Easy Setting Menu Using / , select a menu, then press ENTER. Display Menu: During playback in DVR mode, press DISPLAY once to show the information on the current operation status. Press DISPLAY one more time to show the icons for the available features. DVR MODE T 8 / 8 C 1 / 4 0:00:04/ 1:30:00 2 DVR Play FEB/ 2 8:53 CH12 3 Advanced Menu DVR Menu Initial Setup OSD Language Clock Setting Channel Setting Timer Program Playback Record Easy Setting Menu Reset to factory default 1 Press DISPLAY. DVR MODE T 8 / 8 C 1 / 4 0:00:04/ 1:30:00 4 ? NR SEARCH Each section includes the information as listed below: 1 Playback status icon 2 • Current title number / total number of the titles • Current chapter number / total number of the chapters • Elapsed playback time of the current title / total time of the title 3 • Playback status • Name of the current title 4 Icons for the available features: : Search : Audio : Repeat : Noise Reduction 14 EN Using / , select an Item to set, then press ENTER. Sub menu or option window will appear. Advanced Menu DVR Menu OSD Language Clock Setting Initial SetupOSDELnagnlisgChuahgae nnel Setting Timer ProgramEFsrapçaañPiosllayback Record Easy Setting Menu Reset to factory default Using / / / , make your desirable selection, then press ENTER. Note • This is an example screen only for explanation. Displayed items varies depending on the actual mode. • The information will not appear, when there is no title recorded in the DVR. • Closed Caption and V-Chip will not be displayed while the Display Information is shown on the screen. • The Setup Menu in DVR mode will automatically disappear without any operation during 5 minutes.
-
 1
1 -
2
-
3
-
4
-
5
-
6
-
7
-
8
-
 9
9 -
 10
10 -
 11
11 -
 12
12 -
 13
13 -
 14
14 -
 15
15 -
 16
16 -
 17
17 -
 18
18 -
 19
19 -
20
-
21
-
22
-
23
-
24
-
25
-
26
-
27
-
28
-
29
-
30
-
31
-
32
-
33
-
34
-
35
-
36
-
37
-
38
-
39
-
40
-
41
-
42
-
43
-
44
-
45
-
46
-
47
-
48
-
49
-
50
-
51
-
52
-
53
-
54
-
55
-
56
-
57
-
58
-
59
-
60
-
61
-
62
-
63
-
64
-
65
-
66
-
67
-
68
-
69
-
70
-
71
-
72
-
73
-
74
-
75
-
76
-
77
-
78
-
79
-
80
-
81
-
82
-
83
-
84
-
85
-
86
-
87
-
88
-
89
-
90
-
91
-
92
-
93
-
94
-
95
-
96
 |
 |
