Symphonic CSHP80G Owner's Manual - Page 19
OSD Language Setting, To change the On-Screen Language, Turn on the Unit for the First Time
 |
View all Symphonic CSHP80G manuals
Add to My Manuals
Save this manual to your list of manuals |
Page 19 highlights
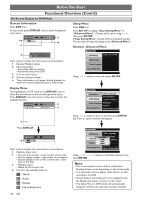
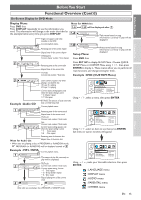
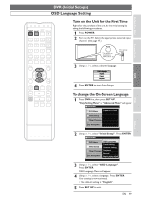
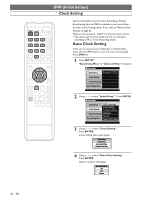
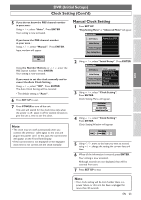
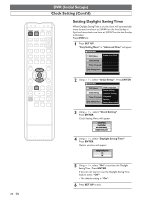
Before You Start Connections DVR (Initial Setups) OSD Language Setting TIMER POWER SET UP PROG. OPEN/CLOSE 1 2 3 CHANNEL 4 5 6 PROGRAM RECORDINGS 7 8 9 CLEAR 0 +10 MODE ZOOM SUB TITLE ANGLE AUDIO MENU TOP MENU DISPLAY ENTER RETURN SKIP DVR DVD SKIP REV PLAY FWD REC/OTR STOP PAUSE SEARCH REPEAT A-B Turn on the Unit for the First Time Right after the purchase of the unit, do the initial setting by taking the following procedures. 1 Press POWER. 2 Turn on the TV. Select the appropriate external input channel. (See page 17.) MODE *This button can be labeled as INPUT,AUX, etc. TV's remote control 3 Using / , select a desired language. OSD Language English Fraçais Español 4 Press ENTER to start Auto Setups. To change the On-Screen Language 1 Press DVR first, then press SET UP. "Easy Setting Menu" or "Advanced Menu" will appear. Advanced Menu DVR Menu Erase All in DVR Initial Setup Timer Program Easy Setting Menu DVR DVD Others 2 Using / , select "Initial Setup". Press ENTER. Advanced Menu DVR Menu Initial Setup OSD Language Clock Setting Channel Setting Timer Program Playback Record Easy Setting Menu Reset to factory default 3 Using / , select "OSD Language". Press ENTER. OSD Language Menu will appear. 4 Using / , select a language. Press ENTER. Your setting is now activated. • The default setting is "English". 5 Press SET UP to exit. EN 19
-
 1
1 -
2
-
3
-
4
-
5
-
6
-
7
-
8
-
9
-
10
-
11
-
12
-
13
-
 14
14 -
 15
15 -
 16
16 -
 17
17 -
 18
18 -
 19
19 -
 20
20 -
 21
21 -
 22
22 -
 23
23 -
 24
24 -
25
-
26
-
27
-
28
-
29
-
30
-
31
-
32
-
33
-
34
-
35
-
36
-
37
-
38
-
39
-
40
-
41
-
42
-
43
-
44
-
45
-
46
-
47
-
48
-
49
-
50
-
51
-
52
-
53
-
54
-
55
-
56
-
57
-
58
-
59
-
60
-
61
-
62
-
63
-
64
-
65
-
66
-
67
-
68
-
69
-
70
-
71
-
72
-
73
-
74
-
75
-
76
-
77
-
78
-
79
-
80
-
81
-
82
-
83
-
84
-
85
-
86
-
87
-
88
-
89
-
90
-
91
-
92
-
93
-
94
-
95
-
96
 |
 |
