TASCAM DM-24 Installation and Use Quick Start Guide - Page 10
Monitoring
 |
View all TASCAM DM-24 manuals
Add to My Manuals
Save this manual to your list of manuals |
Page 10 highlights
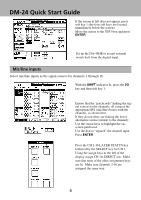
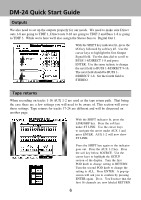
DM-24 Quick Start Guide 3 Return to the CH 17-32 IN screen by pressing the 2nd soft key. Move the cursor to the CH 25-32 column, then use the data dial and the ENTER key to assign the assignable returns 1-4(ASN RTN) to channels 25& 26 and 31& 32. You can now pan those channels left and right, bring their faders to unity gain and assign these channels to the stereo buss. Monitoring Until now we've been using AUX 1-2 as our monitoring source. But at mix down you will use the 2 TR IN. This is so you can monitor the signal being recorded on the DA-45HR. 1 There are three programable selection keys in the control room section. SEL 3 defaults to 2 TR IN. To change these assignments press the SHIFT key so the indicator is lit and press the MONITOR key. Use the cursor keys to highlight AUX 1-2 by the SEL 1 key. Use the data dial to scroll through your choices. Press the ENTER key to make a change. 10
-
 1
1 -
2
-
3
-
4
-
 5
5 -
 6
6 -
 7
7 -
 8
8 -
 9
9 -
 10
10 -
 11
11 -
 12
12 -
 13
13 -
 14
14 -
 15
15 -
16
 |
 |
