TASCAM DM-24 Installation and Use Quick Start Guide - Page 8
Press the CH 17-32 LAYER STATUS key.
 |
View all TASCAM DM-24 manuals
Add to My Manuals
Save this manual to your list of manuals |
Page 8 highlights
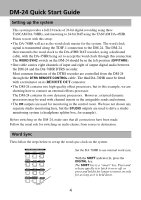
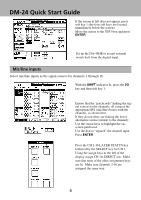
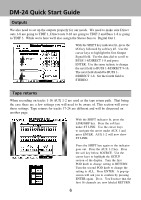
DM-24 Quick Start Guide Tape returns continued Recording and monitoring tracks 17-24 requires different settings than tracks 1-16. Remember that AUX 1-2 is still our tape return path for tracks 1-16. This leaves the first 16 channels available for us to use for our input sources. For this example, use channels 1-8 as your input channels. Use busses 1-8 to buss those signals to tracks 17-24. Channels 17-24 will be the tape return path for tracks 17-24 however, since we are still using AUX 1-2 as our monitoring source we need to set up pre fader aux 1-2 send levels for channels 17-24. This will allow us to monitor all 24 tracks simultaneously. We will not assign channels 17-24 to the stereo buss until we are ready to mix. 1 With the SHIFT indicator lit, press the I/O key and then press the soft key below CH 17-32 IN. Use the cursor keys to highlight the "patchcord" of channel 17 as in the example to the left. Turn the data dial so that channel 17 is linked to TDIF rather than the Mic/Line input then press ENTER. Repeat this process for CH 18-24. Channels 17-24 are now tape returns. changes to 2 Press the CH 17-32 LAYER STATUS key. Press the SELECT key for CH 17. Left of the display locate the ASSIGN buttons. Make sure CH 17 is NOT assigned to ST, BUSS 1-8 or DIRECT OUT. Make sure the same is true of CH 18-24. Bring faders 17-24 down. Press the SHIFT key so the indicator goes out. Now press the AUX 1-2 key. The faders will jump to show the AUX 1-2 send levels of channels 17-32. Press the soft key under SOURCE. Use the cursor keys to highlight the SETUP area of the display. Turn the first POD knob to change the value to PRE. Use the second POD knob to change the value to 17-24 and press ENTER. You will see a pop up screen asking you to confirm your choice. Press ENTER again. Aux 1-2 for CH 17-24 are now all PRE fader. Press the soft key under LEVEL. Now use your faders to set the AUX 1-2 levels for channels 17-24. 8
-
 1
1 -
2
-
 3
3 -
 4
4 -
 5
5 -
 6
6 -
 7
7 -
 8
8 -
 9
9 -
 10
10 -
 11
11 -
 12
12 -
 13
13 -
14
-
15
-
16
 |
 |
