TEAC LPR500 Owners Manual - Page 27
play the source to
 |
View all TEAC LPR500 manuals
Add to My Manuals
Save this manual to your list of manuals |
Page 27 highlights
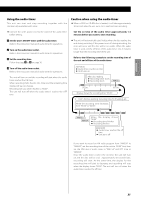
7 Press the PLAY/PAUSE button (y/J) to start recording. 8 If AUX is selected in step 1 , play the source to be recorded. When the playback of the source finishes, press the STOP button (H) to stop recording. When playback of a record finishes and the turntable stops rotating or playback of a cassette tape finishes, recording automatically ends. But to prevent unwanted noise from the tone arm being recorded, stop the recording manually by using the STOP button. A To stop recording When recording is stopped, "REC" and "-End---" blink for several seconds. Do not turn OFF the power or shake the unit during recording or when "REC" and "-----" are blinking. Such actions prevent proper recording. Press the STOP button (H) to stop recording. B To suspend recording temporarily (pause mode) ENGLISH Press the PLAY/PAUSE button (y/J). "bUSY" briefly appears on the display, and the recording is paused. To restart recording, press the PLAY/PAUSE button (y/J). < You cannot restart recording while "bUSY" is displayed. < Remember that every time recording is paused or stopped, a new track number will always be assigned. It is not possible to record in two "stages" within one track. < The unit will not stop or pause even if the PLAY/PAUSE button is pressed within 4 seconds after recording has started. This is due to a CD specification which allows you stop or pause only after 4 seconds of recording. C Manual track division It is possible to divide the recording into tracks while recording. While recording is taking place, press the TRACK INCREMENT button. The current track number will be incremented by one. < The TRACK INCREMENT button works regardless of the MANUAL/AUTO REC setting. < You cannot divide the track manually for tracks of less than 4 seconds in CD specifications. Up to 99 tracks can be divided on one single CD. 27
-
 1
1 -
2
-
3
-
4
-
5
-
6
-
7
-
8
-
9
-
10
-
11
-
12
-
13
-
14
-
15
-
16
-
17
-
18
-
19
-
20
-
21
-
 22
22 -
 23
23 -
 24
24 -
 25
25 -
 26
26 -
 27
27 -
 28
28 -
 29
29 -
 30
30 -
 31
31 -
 32
32 -
33
-
34
-
35
-
36
-
37
-
38
-
39
-
40
-
41
-
42
-
43
-
44
-
45
-
46
-
47
-
48
-
49
-
50
-
51
-
52
-
53
-
54
-
55
-
56
-
57
-
58
-
59
-
60
-
61
-
62
-
63
-
64
 |
 |
