TEAC LPR500 Owners Manual - Page 31
Using the audio timer, Caution when using the audio timer
 |
View all TEAC LPR500 manuals
Add to My Manuals
Save this manual to your list of manuals |
Page 31 highlights
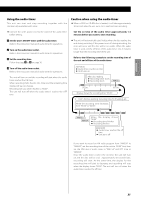
ENGLISH Using the audio timer This unit can start and stop recording together with the commercially available audio timer. Caution when using the audio timer < When a CD-R or CD-RW disc is loaded, it will take approximately 30 seconds after the unit turns on to read and start recording. < Connect the unit's power cord to the outlet of the audio timer before setting. Set the on time of the audio timer approximately 1-2 minutes before you want to start recording. 1 Set the unit's ON/OFF times with the audio timer. Refer to the instruction manual of audio timer for operations. 2 Turn on the audio timer outlet. Refer to the instruction manual of audio timer for operations. 3 Set the recording time. Follow the steps 1 to 5 on page 30. 4 Turn off the audio timer outlet. Refer to the instruction manual of audio timer for operations. < The unit will automatically start finalize when the disc reaches the end during recording. If the power turns off during recording, the error will occur and the disc will be no usable. When the audio timer is used, set the off time of the audio timer 3 to 5 minutes longer than the recording time of the unit. Refer to the following example to set the recording time of the unit and off time of the audio timer. AM7:59:00 < Audio timer reaches on time < Unit turns on The unit will turn on and the recording will start when the audio timer reaches the ON time. When recording starts, the REC OFF timer and the remaining time display will start to change. Recording will stop when reaches to "00:00". The unit will turn off when the audio timer's reaches the OFF time. After disc reading < Recording timer starts < Recording starts AM8:00 00 Sec. 60 Sec. Display shows the recording time "65:00". Unit's finishes working: Including time for finalizing, etc. While the recording time decreases from "65:00" to "00:00". AM9:00 AM9:04 When the display shows "00:00" < Recording time finishes < Recording finishes AM9:08:00 < Audio timer reaches the off time < Unit turns off If you want to record an FM radio program from "AM8:00" to "AM9:00", set the recording time of the unit to "65:00" first, then set the ON time of audio timer to "AM7:59" and OFF time to "AM9:08". Once the audio timer reaches the on time, the unit will turn on and the disc will be read. Approximately 30 seconds later, recording will start. At the same time, the display for the recording time will start to decrease, and recording will stop when the display shows "00:00". The unit will turn off when the audio timer reaches the off time. 31
-
 1
1 -
2
-
3
-
4
-
5
-
6
-
7
-
8
-
9
-
10
-
11
-
12
-
13
-
14
-
15
-
16
-
17
-
18
-
19
-
20
-
21
-
22
-
23
-
24
-
25
-
 26
26 -
 27
27 -
 28
28 -
 29
29 -
 30
30 -
 31
31 -
 32
32 -
 33
33 -
 34
34 -
 35
35 -
 36
36 -
37
-
38
-
39
-
40
-
41
-
42
-
43
-
44
-
45
-
46
-
47
-
48
-
49
-
50
-
51
-
52
-
53
-
54
-
55
-
56
-
57
-
58
-
59
-
60
-
61
-
62
-
63
-
64
 |
 |
