TEAC LPR500 Owners Manual - Page 7
Turntable Cover
 |
View all TEAC LPR500 manuals
Add to My Manuals
Save this manual to your list of manuals |
Page 7 highlights
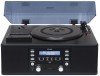
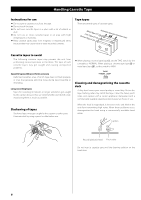
ENGLISH Turntable Cover About CD-R and CD-RW discs CD-R discs can be recorded once only. Once they have been used for recording, they cannot be erased or re-recorded. However, if space is available on the disc (and the disc has not been finalized), additional material can be recorded. By contrast, a CD-RW disc can be used in much the same way as a CD-R disc, but the last track or tracks recorded can be erased, and the space on the disc can be re-used for other recordings. To attach the turntable cover 1. Slide the hinges into the hinge fittings on both sides of the rear of the turntable. 2. Place the turntable cover hinge fittings over the top portion of the hinges and slide the cover down into place. However, you should note that an audio CD created using a CDRW disc may not play back satisfactorily on every audio CD player. CD-R, by contrast, may be played satisfactorily on the majority of audio CD players. Finalizing Although audio data may be written on a CD-R or CD-RW disc, a standard CD player will not be able to play back the audio until a final table of contents (TOC) has been written at the start of the disc. The process of writing this table of contents is known as "finalizing". Once this has been done, no further data can be written to the disc. Note that a CD-RW disc that has been finalized can be "unfinalized". This allows further tracks to be recorded to the disc, provided that there is space on the disc. To detach the turntable cover Hold the cover on both sides and gently pull upward to remove it from the hinges. How to open/close the turntable cover < Repeat, shuffle and programmed playback do not work with unfinalized (NO TOC) discs. Recordable discs In this manual, we use the term "recordable" disc to describe a CD-R or CD-RW disc that has not been finalized, and has enough space to record. To Open: Lift the turntable cover halfway until it stops. < The cover will now stay open. To Close: Slowly lower the cover until it touches the turntable base. Note: Make sure you grasp the cover by the front edge to avoid removing hinges. Be careful not to pinch your fingers when the cover closes. 7
-
 1
1 -
 2
2 -
 3
3 -
 4
4 -
 5
5 -
 6
6 -
 7
7 -
 8
8 -
 9
9 -
 10
10 -
 11
11 -
 12
12 -
13
-
14
-
15
-
16
-
17
-
18
-
19
-
20
-
21
-
22
-
23
-
24
-
25
-
26
-
27
-
28
-
29
-
30
-
31
-
32
-
33
-
34
-
35
-
36
-
37
-
38
-
39
-
40
-
41
-
42
-
43
-
44
-
45
-
46
-
47
-
48
-
49
-
50
-
51
-
52
-
53
-
54
-
55
-
56
-
57
-
58
-
59
-
60
-
61
-
62
-
63
-
64
 |
 |