TEAC TA-1VP TA-1VP owners manual - Page 15
Setting Up the TASCAM Vocal Producer
 |
View all TEAC TA-1VP manuals
Add to My Manuals
Save this manual to your list of manuals |
Page 15 highlights
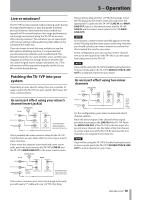
3 - Setting Up the TASCAM Vocal Producer Setting up the TA-1VP is very straightforward. 1 Find a suitable location. The TA-1VP is designed to be mounted in a standard 19-inch equipment rack. 2 Connect an audio output to the LINE IN jack or connect a microphone to the front panel MIC IN jack (see Chapter 5 for details of patching the TA‑1VP into your system). 3 Connect a cable to the MAIN LINE OUT jack. If you will be using the TA-1VP's Stereo Double Tracking feature, connect a second cable to the DOUBLE TRACK LINE OUT and route as desired (see Chapter 5 for details of patching the TA-1VP into your system). 4 If you will be controlling your TA-1VP via MIDI, connect a MIDI cable from your MIDI source to the TA-1VP's MIDI IN jack. 5 The included PS-1225L AC adaptor will automatically adjust to the available power world wide. The AC power cord supplied with the AC adaptor is correct for the country where the TA‑1VP is first sold. Contact TASCAM for replacement power cords or adapters. IMPORTANT! Do not attempt to modify the adaptor or use any other adaptor that is not specifically intended for the TA-1VP. 6 Connect the AC adaptor's DC plug to the DC IN 12V jack on the rear of the TA-1VP. Then plug the AC adaptor into an AC outlet. Your TA-1VP will briefly display the version number of its internal firmware and then display the Select Preset page. TASCAM PS-1225L DC plug AC outlet Use the hook (cord holder) on the rear panel to secure the AC adaptor cord. When connecting the cord to the unit, wrap it through the holder to prevent it from becoming disconnected during use. TASCAM TA-1VP 15
-
 1
1 -
2
-
3
-
4
-
5
-
6
-
7
-
8
-
9
-
 10
10 -
 11
11 -
 12
12 -
 13
13 -
 14
14 -
 15
15 -
 16
16 -
 17
17 -
 18
18 -
 19
19 -
 20
20 -
21
-
22
-
23
-
24
-
25
-
26
-
27
-
28
-
29
-
30
-
31
-
32
-
33
-
34
-
35
-
36
-
37
-
38
-
39
-
40
-
41
-
42
-
43
-
44
 |
 |
