TEAC TA-1VP TA-1VP owners manual - Page 23
MIDI Controllers Footswitch Assign
 |
View all TEAC TA-1VP manuals
Add to My Manuals
Save this manual to your list of manuals |
Page 23 highlights
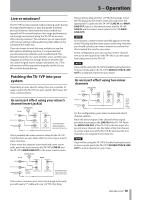
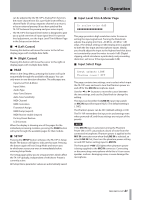
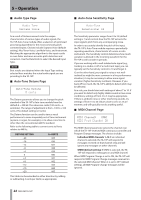
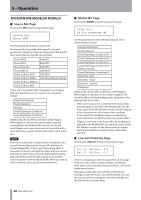
5 - Operation ªª MIDI Controllers Page MIDI Controllers Auto-Tune Speed OFF This page allows you to assign MIDI Continuous Controllers to various TA-1VP functions. Using MIDI control messages, you can vary multiple TA-1VP parameters in real time using a MIDI fader box or automate dynamic parameter changes using a MIDI sequencer. To make use of MIDI control, you must have your MIDI source patched to the TA-1VP's MIDI input and the messages must be sent on the MIDI channel selected in the MIDI Channel page described above. All parameters are initially assigned to OFF (i.e., they will not respond to any controller). To assign a MIDI Continuous Controller to a TA-1VP parameter, use the Data Knob to scroll to the desired parameter. Then press the Á (Right Cursor) button to move to the Controller Number field and use the Data Knob to select the desired controller. For maximum flexibility, it's possible to assign one MIDI controller to multiple TA-1VP parameters. However, this could also become confusing. To help you keep track of what you've previously assigned, as you scroll through the controller numbers an asterisk "*" will appear to the left of any controller number that is currently assigned to another parameter. NOTE All 128 MIDI controllers (0-127) are available for assignment. However, keep in mind that some are typically predefined for certain functions (Mod Wheel, Channel Volume, etc.). If other MIDI devices are being controlled on the same MIDI channel as the TA-1VP, it may be prudent to avoid these predefined controllers. The following parameters can be controlled via MIDI: Auto-Tune Speed De-esser High Pass Frequency Auto-Tune ON/OFF De-esser Attack Tube Warmth De-esser Release Source Mic Proximity De-esser ON/OFF Model Mic Proximity EQ1 Frequency Mic Mod ON/OFF EQ1 Q Compressor Threshold EQ1 Slope Compressor Ratio EQ1 Gain Compressor Makeup Gain EQ2 Frequency Compressor Attack EQ2 Q Compressor Release EQ2 Slope Gate Threshold EQ2 Gain Gate Ratio EQ ON/OFF Comp/Gate ON/OFF Double Track Mix De-esser Threshold Double Track ON/OFF De-esser Ratio Output Gain ªª Footswitch Assign Page Footswitch Assign Main Bypass OFF To assign a footswitch to control one or more TA-1VP functions, use the Data Knob to select the desired function and then press the Á (Right Cursor) button to move to the ON/OFF field and select ON. The following functions can be controlled by a footswitch (The default setting is all off ): Main Bypass Increment Preset Mic Mod ON/OFF Auto-Tune ON/OFF Comp/Gate ON/OFF De-esser ON/OFF EQ ON/OFF Double Track ON/OFF NOTE Engaging Main Bypass via the footswitch results in the display of the Main Bypass screen and locks out all other button presses until Bypass is disengaged (either via the footswitch or a physical button press). For maximum flexibility, it is possible to assign the footswitch to multiple parameters. You would typically use this capability to turn multiple modules on or off with a single press of the footswitch. However, it is also possible to assign the footswitch to combinations of functions that don't make much practical sense. Specifically, be aware of the following: •• If the footswitch is set to control Main Bypass, all other assignments are ignored •• If the footswitch is set to Increment Preset and one or more of the module ON/OFF functions, each time you press the footswitch the TA-1VP will advance to the next Preset and the ON/OFF state of the assigned module(s) will be toggled. Hence, alternate presets will have the selected modules ON, then OFF, then ON, etc. NOTE •• It's generally not a good idea to plug in a footswitch while the TA-1VP is powered up. While it will do no physical harm, the momentary short caused by the plug moving past the contacts will be interpreted as a footswitch depression, causing potentially unexpected results. •• There are two varieties of footswitches: those that are shorted by default and those that are open by default. To ensure your footswitch works correctly, you should plug in your footswitch and then power on the TA‑1VP. The TA-1VP will detect which kind of foot switch you have and behave accordingly. (If a normally open footswitch is plugged in after powerup, it will work correctly. However, if a normally shorted footswitch is plugged in after powerup, it will register "pressed" whenever it's not actually being pressed. TASCAM TA-1VP 23
-
 1
1 -
2
-
3
-
4
-
5
-
6
-
7
-
8
-
9
-
10
-
11
-
12
-
13
-
14
-
15
-
16
-
17
-
 18
18 -
 19
19 -
 20
20 -
 21
21 -
 22
22 -
 23
23 -
 24
24 -
 25
25 -
 26
26 -
 27
27 -
 28
28 -
29
-
30
-
31
-
32
-
33
-
34
-
35
-
36
-
37
-
38
-
39
-
40
-
41
-
42
-
43
-
44
 |
 |
