TEAC TA-1VP TA-1VP owners manual - Page 20
Controls and Display Screens
 |
View all TEAC TA-1VP manuals
Add to My Manuals
Save this manual to your list of manuals |
Page 20 highlights
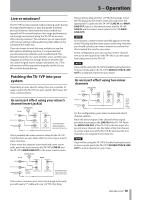
5 - Operation With an instrument INSTRUMENT TA-1VP LINE IN RECORDER CHANNEL 1 CHANNEL 2 MAIN LINE OUT WITH AN INSTRUMENT DOUBLE TRACK LINE OUT OPTIONAL If you are recording directly to a tape deck or hard disk recorder, patch the output from an instrument into the TA‑1VP's LINE IN and the TA-1VP's MAIN LINE OUT into your recorder. If you will be using the TA-1VP's Double Tracking function in stereo mode, patch the TA-1VP's DOUBLE TRACK LINE OUT to a separate channel on your recorder. Live, Direct Microphone connection The TA-1VP can be used between a microphone and the mixer input if the mixer does not have an insert point. Connect the microphone to the front panel MIC IN connector and select Phantom power if required for your microphone. If the signal from the microphone is exceptionally loud, press the front panel -20dB button to lower the sensitivity. Adjust the level using the Setup : "In Analog trim" setting. If you will be using the TA-1VP's Double Tracking function in stereo mode, patch the TA-VP's DOUBLE TRACK LINE OUT to a separate channel on the mixer. The TA-1VP output is at line level, not microphone level, so be sure to choose an appropriate input on the mixer. AN IMPORTANT NOTE ABOUT MONITORING If the TA-1VP is used to Auto-Tune an artist's performance in real time, it is important that the performer is able to monitor their original signal, not the pitch-corrected signal. Trying to react musically to the processed signal will drive them crazy and, in most cases, drive them farther off pitch. 20 TASCAM TA-1VP Controls and Display Screens MASTER MODULE ªª Preset Select When the TA-1VP is first powered up, it will briefly display the version of its internal firmware and will then display the Preset Selection screen: Select Preset: ##: Preset Name Use the Data Knob to select the desired preset. Presets may also be selected by MIDI Program Change commands and may be stepped through sequentially using a footswitch. Pressing the PRESET button will always return you to this screen. NOTE Depending on the relative settings of adjacent presets, changing presets while the TA-1VP is processing audio may result in audible artifacts. If you are using the TA‑1VP in live performance, care should be taken to change presets while no audio is being processed. ªª Factory Presets The TA-1VP provides the ability to store 35 presets. All of these preset locations initially contain factory presets. The factory presets can be edited or replaced entirely. Should you wish, you can always restore the factory presets at a later time (see the "Restore Factory Presets" page below.) A couple of things to keep in mind about the factory presets: 1. Except for those that use it as a special effect, all factory presets have the Auto-Tune module turned off. If you want to include Auto-Tune in a factory preset, either edit the preset and resave it, or copy the preset to an unused location and edit the copy. 2. Presets that include double tracking default to Stereo Mode and Auto-Tune set to a chromatic scale. Again, edit and resave or copy as desired. ªª INPUT Meter These five LEDs light to indicate the level of the incoming audio. Ideally, you should adjust the input to the highest level that does not consistently cause the top red LED to light. (The red LED lights at a level of -3 dB. Digital clipping, which introduces a particularly nasty-sounding distortion, will occur if the input exceeds 0 dB.) NOTE •• This meter reflects the level of the analog audio input. It is not affected by the digital Input Trim described below in the Setup Menu. Depending on how you have patched the TA-1VP into your system, the input level
-
 1
1 -
2
-
3
-
4
-
5
-
6
-
7
-
8
-
9
-
10
-
11
-
12
-
13
-
14
-
 15
15 -
 16
16 -
 17
17 -
 18
18 -
 19
19 -
 20
20 -
 21
21 -
 22
22 -
 23
23 -
 24
24 -
 25
25 -
26
-
27
-
28
-
29
-
30
-
31
-
32
-
33
-
34
-
35
-
36
-
37
-
38
-
39
-
40
-
41
-
42
-
43
-
44
 |
 |
