TP-Link TL-R860 User Guide - Page 10
Connecting the Router - ip
 |
UPC - 845973040109
View all TP-Link TL-R860 manuals
Add to My Manuals
Save this manual to your list of manuals |
Page 10 highlights
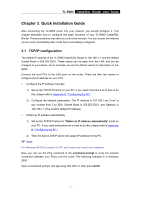
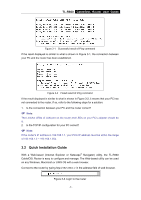
TL-R860 Cable/DSL Router User Guide Chapter 2. Connecting the Router 2.1 System Requirements ¾ Broadband Internet Access Service (DSL/Cable/Ethernet) ¾ One DSL/Cable modem that has an RJ45 connector (It's not necessary if you connect the router to Ethernet) ¾ Each PC on the LAN needs a working Ethernet Adapter and an Ethernet cable with RJ45 connectors ¾ TCP/IP protocol must be installed on each PC ¾ Web browser, such as Microsoft Internet Explorer 5.0 or later, Netscape Navigator 6.0 or later 2.2 Installation Environment Requirements ¾ Not in direct sunlight or near a heater or heating vent ¾ Not cluttered or crowded. There should be at least 2 inches (5 cm) of clear space on all sides of the router ¾ Well ventilated (especially if it is in a closet) ¾ Operating temperature: 0℃~40℃ (32℉~104℉) ¾ Operating Humidity: 10%~90%RH, Non-condensing 2.3 Connecting the Router Before you install the router, you should connect your PC to the Internet through your broadband service successfully. If there is any problem, please contact with your ISP for help. After that, please install the router according to the following steps. Don't forget to pull out the power plug and keep your hands dry. 1. Power off your PC(s), Cable/DSL modem, and the router. 2. Connect the PC(s) and all Switches/Hubs on your LAN to the LAN Ports on the router, shown in Figure 2-1. 3. Connect the DSL/Cable modem to the WAN port on the router, shown in Figure 2-1. 4. Connect the AC power adapter to the AC power socket on the router, and the other end into an electrical outlet. The router will start to work automatically. 5. Power on your PC(s) and Cable/DSL modem. - 5 -
-
 1
1 -
2
-
3
-
4
-
 5
5 -
 6
6 -
 7
7 -
 8
8 -
 9
9 -
 10
10 -
 11
11 -
 12
12 -
 13
13 -
 14
14 -
 15
15 -
16
-
17
-
18
-
19
-
20
-
21
-
22
-
23
-
24
-
25
-
26
-
27
-
28
-
29
-
30
-
31
-
32
-
33
-
34
-
35
-
36
-
37
-
38
-
39
-
40
-
41
-
42
-
43
-
44
-
45
-
46
-
47
-
48
-
49
-
50
-
51
-
52
-
53
-
54
-
55
-
56
-
57
-
58
-
59
-
60
-
61
-
62
-
63
 |
 |
