TP-Link TL-R860 User Guide - Page 12
Quick Installation Guide - manual
 |
UPC - 845973040109
View all TP-Link TL-R860 manuals
Add to My Manuals
Save this manual to your list of manuals |
Page 12 highlights
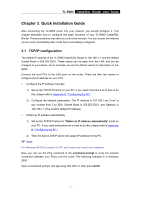
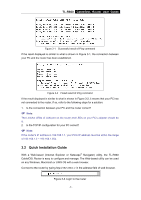
TL-R860 Cable/DSL Router User Guide Chapter 3. Quick Installation Guide After connecting the TL-R860 router into your network, you should configure it. This chapter describes how to configure the basic functions of your TL-R860 Cable/DSL Router. These procedures may take you only a few minutes. You can access the Internet via the router immediately after it has been successfully configured. 3.1 TCP/IP configuration The default IP address of the TL-R860 Cable/DSL Router is 192.168.1.1, and the default Subnet Mask is 255.255.255.0. These values can be seen from the LAN, and can be changed as your desire. As an example, we use the default values for description in this guide. Connect the local PCs to the LAN ports on the router. There are then two means to configure the IP address for your PCs. ¾ Configure the IP address manually 1) Set up the TCP/IP Protocol for your PC. If you need instructions as to how to do this, please refer to Appendix B: "Configuring the PC." 2) Configure the network parameters. The IP address is 192.168.1.xxx ("xxx" is any number from 2 to 254), Subnet Mask is 255.255.255.0, and Gateway is 192.168.1.1 (The router's default IP address) ¾ Obtain an IP address automatically 1) Set up the TCP/IP Protocol in "Obtain an IP address automatically" mode on your PC. If you need instructions as to how to do this, please refer to Appendix B: "Configuring the PC." 2) Then the built-in DHCP server will assign IP address for the PC. ) Note: For Windows 98 OS or earlier, the PC and router may need to be restarted. Now, you can run the Ping command in the command prompt to verify the network connection between your PC(s) and the router. The following example is in Windows 2000. Open a command prompt, and type ping 192.168.1.1, then press Enter. - 7 -
-
 1
1 -
2
-
3
-
4
-
5
-
6
-
 7
7 -
 8
8 -
 9
9 -
 10
10 -
 11
11 -
 12
12 -
 13
13 -
 14
14 -
 15
15 -
 16
16 -
 17
17 -
18
-
19
-
20
-
21
-
22
-
23
-
24
-
25
-
26
-
27
-
28
-
29
-
30
-
31
-
32
-
33
-
34
-
35
-
36
-
37
-
38
-
39
-
40
-
41
-
42
-
43
-
44
-
45
-
46
-
47
-
48
-
49
-
50
-
51
-
52
-
53
-
54
-
55
-
56
-
57
-
58
-
59
-
60
-
61
-
62
-
63
 |
 |
