TP-Link TL-SC4171G User Guide - Page 37
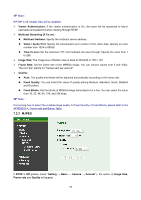
Image Rotate, Audio Codec, Exposure mode, White Balance, Overlay, Text Overlay, Text color
 |
UPC - 845973054045
View all TP-Link TL-SC4171G manuals
Add to My Manuals
Save this manual to your list of manuals |
Page 37 highlights
¾ Image Rotate: Select the screen display "flip", "mirror", or "flip + mirror." ¾ Audio Codec: If this option is selected "On", the microphone will start sound reception. ¾ Exposure mode: You can choose 50Hz, 60Hz or Auto. If you choose Auto option, the camera will adjust automatically to perform well. ¾ White Balance: You can choose the white balance to Auto, Florescent, Incandescent and Black & White. ¾ IR: You can turn IR light On/Off or Auto. If you select Auto mode, you can adjust threshold for IR Auto-On and Auto-Off respectively. In the right hand side of threshold bar, if the tool bar is closer to the right, the IR will auto-on easily in the dark environment. Conversely, in the left hand side of threshold bar, if the tool bar is more approached to the left, the IR will auto-off easily in the bright environment. ) Note: 1. The effective range of the IR (Infrared) light is 10 meters (33 feet), and it is strongly suggested that you install it in a place without any barriers within 3 meters of the field of view (10 feet). Reflected light from a large closed barrier (such as a wall) may cause the camera to shut down the infrared light. 2. Normally, 10 seconds after the environment becomes darker than the threshold, the camera will turn on the IR (Infrared) light. One typical abnormal situation is that a barrier is very close to the camera and shields all available light. ¾ Overlay: z Text Overlay: You can see some information on the display screen which includes Text color, Background color, Alias, Date/Time and Display position. 32
-
 1
1 -
2
-
3
-
4
-
5
-
6
-
7
-
8
-
9
-
10
-
11
-
12
-
13
-
14
-
15
-
16
-
17
-
18
-
19
-
20
-
21
-
22
-
23
-
24
-
25
-
26
-
27
-
28
-
29
-
30
-
31
-
 32
32 -
 33
33 -
 34
34 -
 35
35 -
 36
36 -
 37
37 -
 38
38 -
 39
39 -
 40
40 -
 41
41 -
 42
42 -
43
-
44
-
45
-
46
-
47
-
48
-
49
-
50
-
51
-
52
-
53
-
54
-
55
-
56
-
57
-
58
-
59
-
60
-
61
-
62
-
63
-
64
-
65
-
66
-
67
-
68
-
69
-
70
-
71
-
72
-
73
-
74
-
75
-
76
-
77
-
78
-
79
-
80
-
81
-
82
-
83
-
84
-
85
-
86
 |
 |
