TP-Link TL-WA5110G User Guide - Page 13
System Requirements, 4 Environment Requirements, 5 Connecting the Device - install
 |
UPC - 845973051327
View all TP-Link TL-WA5110G manuals
Add to My Manuals
Save this manual to your list of manuals |
Page 13 highlights
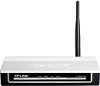
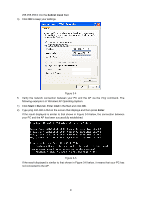
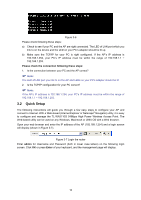
There are two ways to reset the AP's factory defaults: • Use the Factory Defaults function on System Tools -> Factory Defaults page in the AP's Web-based Utility. • Use the Factory Default RESET button: Press and hold the default RESET button for 5 seconds, and then the AP will reboot after the System LED flashes 5 times. ) Note: Ensure the AP is powered on before it restarts completely. ¾ One LAN 10/100Mbps RJ45 port for connecting the AP to hub or switch. ¾ AC power socket: only use the power adapter supplied with the TL-WA5110G 54Mbps High Power Wireless Access Point, use of a different adapter may result in product damage. 2.3 System Requirements ¾ Each PC in the LAN needs a working Ethernet Adapter and an Ethernet cable with RJ45 connectors ¾ TCP/IP protocol must be installed on each PC ¾ Web browser, such as Microsoft Internet Explorer 5.0 or later, Netscape Navigator 6.0 or later ¾ If the device is configured to AP client router mode, you also need Wireless Internet Access Service (WISP) ¾ If the device is configured to AP router mode, you also need Broadband Internet Access Service (DSL/Cable/Ethernet) ¾ One DSL/Cable Modem that has an RJ45 connector (you do not need it if you connect the router to the Ethernet) 2.4 Environment Requirements ¾ Do not place in direct sunlight or near a heater or heating vent ¾ Do not cluttered or crowded. There should be at least 2 inches (5 cm) of clear space on all sides of the router ¾ Well ventilated (especially if it is in a closet) ¾ Operating temperature: 0℃~40℃ (32℉~104℉) ¾ Operating Humidity: 10%~90% RH, Non-condensing 2.5 Connecting the Device Figure 2-3 is an example of an infrastructure network incorporating the TL-WA5110G. An Infrastructure network contains an access point or a wireless router. To establish an infrastructure network in AP mode, please take the following steps: 1. You will need broadband Internet access (a Cable or DSL-subscriber line into your home or office). Consult with your Cable or DSL provider for proper installation of the modem. 2. Connect the Cable or DSL modem to a Router. Quickly install the router. 3. Locate an optimum location for the AP. The best place is usually near the center of the area in which your PC(s) will wirelessly connect. The place must accord with the Installation Environment Requirements. 4. Adjust the direction of the antenna. Normally, upright is a good direction. 5
-
 1
1 -
2
-
3
-
4
-
5
-
6
-
7
-
 8
8 -
 9
9 -
 10
10 -
 11
11 -
 12
12 -
 13
13 -
 14
14 -
 15
15 -
 16
16 -
 17
17 -
 18
18 -
19
-
20
-
21
-
22
-
23
-
24
-
25
-
26
-
27
-
28
-
29
-
30
-
31
-
32
-
33
-
34
-
35
-
36
-
37
-
38
-
39
-
40
-
41
-
42
-
43
-
44
-
45
-
46
-
47
-
48
-
49
-
50
-
51
-
52
-
53
-
54
-
55
-
56
-
57
-
58
-
59
-
60
-
61
-
62
-
63
-
64
-
65
-
66
-
67
-
68
-
69
-
70
-
71
-
72
-
73
-
74
-
75
-
76
-
77
-
78
-
79
-
80
-
81
-
82
-
83
-
84
-
85
-
86
-
87
-
88
-
89
-
90
-
91
-
92
-
93
-
94
-
95
-
96
-
97
-
98
-
99
-
100
-
101
-
102
-
103
-
104
-
105
-
106
-
107
-
108
-
109
 |
 |