TP-Link TL-WN353G User Guide - Page 8
Installation Guide - pci adapter driver
 |
View all TP-Link TL-WN353G manuals
Add to My Manuals
Save this manual to your list of manuals |
Page 8 highlights
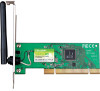
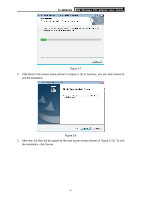
TL-WN353G 54M Wireless PCI Adapter User Guide Chapter 2 Installation Guide 2.1 Hardware Installation To install the Adapter, follow these steps listed below: 1. Turn off your desktop PC and disconnect the power. 2. Remove your PC case and locate an available PCI slot on the mianboard. Remove the metal slot cover on the back of the PC. Check with your computer manufacturer for instructions if needed. 3. Slide the PCI Adapter into the PCI slot. Make sure that all of its pins are touching the slot's contacts. Once the adapter is firmly in place, secure its fastening tab to your PC's chassis with a mounting screw. Then, close your PC case. 4. Reconnect your PC's power and turn on your desktop PC. 2.2 Software Installation 2.2.1 Overview The Adapter's Setup Wizard will guide you through the Installation procedure for Windows XP and Vista. The Setup Wizard will install the TP-LINK Wireless Utility and drivers. When you install the hardware before installing the software, the system will prompt "Found New Hardware Wizard", click Cancel, and run the Setup Wizard program on the CD-ROM. The Setup steps for Windows operation Systems are very similar. The User guide takes the Windows XP for example to explain the installation. 2.2.2 Software Installation for Windows XP Step 1: Insert the Resource CD into your CD-ROM drive, and open the folder with the same name as your product. Then double-click Setup.exe in the proper folder to start the installation, and Figure 2-1 will appear. Click Cancel to end the installation in the screen. Otherwise, the installation will continue. 2
-
 1
1 -
2
-
 3
3 -
 4
4 -
 5
5 -
 6
6 -
 7
7 -
 8
8 -
 9
9 -
 10
10 -
 11
11 -
 12
12 -
 13
13 -
14
-
15
-
16
-
17
-
18
-
19
-
20
-
21
-
22
-
23
-
24
-
25
-
26
-
27
-
28
-
29
-
30
-
31
-
32
-
33
-
34
-
35
-
36
 |
 |