TP-Link TL-WR841N User Guide - Page 53
Disable All - repeater
 |
UPC - 845973051242
View all TP-Link TL-WR841N manuals
Add to My Manuals
Save this manual to your list of manuals |
Page 53 highlights
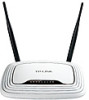
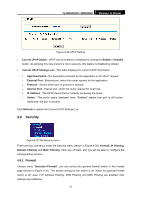
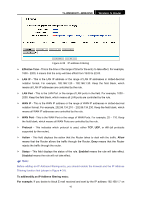
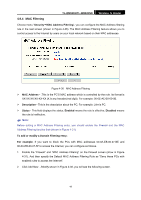
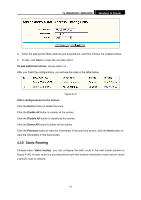
TL-WR841N/TL-WR841ND Wireless N Router To Add a Domain filtering entry: For example: if you want to block the PCs on your LAN from accessing websites www.xxyy.com.cn, www.aabbcc.com and websites with end of .net on the Internet, while no limit for other websites, you can configure as follows. 1. Click Add New.../Modify shown in Figure 4-34, you will see following screen. Figure 4-35 Add or Modify a Domain Filtering entry 2. Enter the "Effective time" and "Domain Name" in the screen shown in Figure 4-35. 3. Select the "Status" for the rule as shown in the screen. 4. Finally, click Save to make the rule take effect. To add additional entries, repeat steps 1-4. After you finish the configurations, you will see the rules in the table below: Other configurations for the entries: Click the Delete button to delete the entry. Click the Enable All button to enable all the entries. Click the Disable All button to disable all the entries. Click the Delete All button to delete all the entries. Click the Previous button to view the information in the previous screen, click the Next button to view the information in the next screen. 48
-
 1
1 -
2
-
3
-
4
-
5
-
6
-
7
-
8
-
9
-
10
-
11
-
12
-
13
-
14
-
15
-
16
-
17
-
18
-
19
-
20
-
21
-
22
-
23
-
24
-
25
-
26
-
27
-
28
-
29
-
30
-
31
-
32
-
33
-
34
-
35
-
36
-
37
-
38
-
39
-
40
-
41
-
42
-
43
-
44
-
45
-
46
-
47
-
 48
48 -
 49
49 -
 50
50 -
 51
51 -
 52
52 -
 53
53 -
 54
54 -
 55
55 -
 56
56 -
 57
57 -
 58
58 -
59
-
60
-
61
-
62
-
63
-
64
-
65
-
66
-
67
-
68
-
69
-
70
-
71
-
72
-
73
-
74
-
75
-
76
 |
 |