TRENDnet TEW-673GRU Quick Installation Guide
TRENDnet TEW-673GRU Manual
 |
UPC - 710931600445
View all TRENDnet TEW-673GRU manuals
Add to My Manuals
Save this manual to your list of manuals |
TRENDnet TEW-673GRU manual content summary:
- TRENDnet TEW-673GRU | Quick Installation Guide - Page 1
Quick Installation Guide TEW-673GRU 1.01 - TRENDnet TEW-673GRU | Quick Installation Guide - Page 2
Table of Contents English 1 1. Before You Start 1 2. Hardware Installation 2 3. Configure the Wireless Router 4 4. Installing the Utility 8 5. Printing 10 6. Scanning 11 7. Storage 12 Troubleshooting 13 Version 12.21.2009 - TRENDnet TEW-673GRU | Quick Installation Guide - Page 3
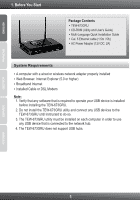
the TEW-673GRU. 2. Do not install the TEW-673GRU utility and connect any USB devices to the TEW-673GRU until instructed to do so. 3. The TEW-673GRU utility must be installed on each computer in order to use any USB device that is connected to the network hub. 4. The TEW-673GRU does not support USB - TRENDnet TEW-673GRU | Quick Installation Guide - Page 4
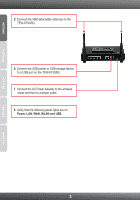
printer to the USB port on the TEW-673GRU, install the printer drivers on your computer. Then shutdown the printer and disconnect the printer from your computer. Note: Please refer to your printer's manual for printer installation instructions. 3. Connect one end of a RJ-45 cable to the TEW-673GRU - TRENDnet TEW-673GRU | Quick Installation Guide - Page 5
ENGLISH FRANÇAIS DEUTSCH ESPAÑOL 5. Connect the 3dBi detachable antennas to the TEW-673GRU. 6. Connect the USB printer or USB storage device to a USB port on the TEW-673GRU. 7. Connect the AC Power Adapter to the wireless router and then to a power outlet. 8. Verify that the following panel - TRENDnet TEW-673GRU | Quick Installation Guide - Page 6
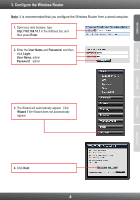
the Wireless Router from a wired computer. 1. Open your web browser, type http://192.168.10.1 in the Address bar, and then press Enter. 2. Enter the User Name and Password, and then click Login. User Name: admin Password: admin 3. The Wizard will automatically appear. Click Wizard if the Wizard does - TRENDnet TEW-673GRU | Quick Installation Guide - Page 7
Next. Note: Do not change default settings unless it is conflicting with your existing hardware. 8. Configure the settings based on information provided by your ISP. Follow the wizard instructions to complete the configuration. Note: Each Internet Connection type may have different options. 5 - TRENDnet TEW-673GRU | Quick Installation Guide - Page 8
TRENDnet673N. By default, the SSID for 5GHz WLAN is TRENDnet673A. Note: It is recommended that you enable encryption on the wireless router. Please refer to the User Guide on the User's Guide CD-ROM for information on setting up encryption on the wireless router. 10. Click Restart. 11. Click Close - TRENDnet TEW-673GRU | Quick Installation Guide - Page 9
regarding the TEW-673GRU's configuration and advanced settings, please refer to the Troubleshooting section, User's Guide on the Utility CD-ROM, or TRENDnet's website at http://www.trendnet.com. Register Your Product To ensure the highest level of customer service and support, please take - TRENDnet TEW-673GRU | Quick Installation Guide - Page 10
drivers on your computer. Then shutdown the printer and disconnect the printer from your computer. Please refer to your printer's manual for printer installation instructions. 2. For Mac OS X (10.1~10.4) instructions, please refer to the User's Guide on the Utility CD-ROM. 1. Insert the Utility - TRENDnet TEW-673GRU | Quick Installation Guide - Page 11
ENGLISH FRANÇAIS DEUTSCH ESPAÑOL 4. Click Next. 5. Follow the InstallShield Wizard instructions. Then click Finish. 9 - TRENDnet TEW-673GRU | Quick Installation Guide - Page 12
X (10.1~10.4) instructions, please refer to the User's Guide on the Utility CD-ROM. 1. Double click on the TRENDnet USB Control Center icon. 2. Select the printer. Click Auto-Connect Printer and click Set Auto-Connect Printer. 3. Select the desired printer and click Apply. 4. The USB Device Control - TRENDnet TEW-673GRU | Quick Installation Guide - Page 13
For Mac OS X (10.1~10.4) instructions, please refer to the User's Guide on the Utility CD-ROM. 1. Select the printer. Click Network Scanner. 2. Place the document on the Multi-Function Printer's Scanner bed. 3. Click Scan. 4. Type in a name, select image type and choose the desired path. Then click - TRENDnet TEW-673GRU | Quick Installation Guide - Page 14
ÇAIS DEUTSCH 7. Storage Note: 1. Only one user can connect to the USB storage device at a time. 2. For Mac OS X (10.1~10.4) instructions, please refer to the User's Guide on the Utility CD-ROM. 1. Double click on the TRENDnet USB Control Center icon. 2. Click Connect. 3. Select Open folder to view - TRENDnet TEW-673GRU | Quick Installation Guide - Page 15
TEW-673GRU's web configuration page? 1. Check your hardware settings again by following the instructions in Section 2. 2. Make sure the LAN and WLAN lights are lit. 3. Make sure your TCP/IP settings are set to Obtain an IP address automatically (see the steps below). 4. Press on the factory reset - TRENDnet TEW-673GRU | Quick Installation Guide - Page 16
I do? 1. Make sure that the antenna is connected to the TEW-673GRU. 2. Double check that the WLAN light on the Router is lit. 3. Login to your router. Enter http://192.168.10.1 into the address bar of your router. The default user name and password is admin. Click Wireless and then click Basic. Make - TRENDnet TEW-673GRU | Quick Installation Guide - Page 17
. 5. Keep pressing the up arrow to exit the selected submenu option. 6. Press the up arrow to exit the selected menu option. If you still encounter problems or have any questions regarding the TEW-673GRU, please contact TRENDnet's Technical Support Department. 15 - TRENDnet TEW-673GRU | Quick Installation Guide - Page 18
- TRENDnet TEW-673GRU | Quick Installation Guide - Page 19
of the developers. TRENDnet does not provide technical support for these codes. available for download from TRENDnet's web site (http://trendnet.com/downloads/list_gpl.asp) for at least three years from the product shipping date. You could also request the source codes by contacting TRENDnet - TRENDnet TEW-673GRU | Quick Installation Guide - Page 20
Os códigos fonte estão disponíveis para download no site da TRENDnet (http://trendnet.com/langen/downloads/list_gpl.asp) por pelo menos três anos da data 961-5500, Fax: +1-310-961-5511. Certifications This equipment has been tested and found to comply with FCC and CE Rules. Operation is subject to - TRENDnet TEW-673GRU | Quick Installation Guide - Page 21
Product Warranty Registration Please take a moment to register your product online. Go to TRENDnet's website at http://www.trendnet.com/register Copyright ©2010. All Rights Reserved. TRENDnet.
-
 1
1 -
 2
2 -
 3
3 -
 4
4 -
 5
5 -
 6
6 -
 7
7 -
8
-
9
-
10
-
11
-
12
-
13
-
14
-
15
-
16
-
17
-
18
-
19
-
20
-
21
 |
 |

TEW-673GRU
1.01
Quick Installation Guide