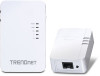
TRENDnet TPL-410APK User's Guide - Page 32
Add adapters to your network, Ethernet Connection ETH LED
 |
View all TRENDnet TPL-410APK manuals
Add to My Manuals
Save this manual to your list of manuals |
Page 32 highlights
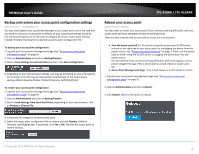
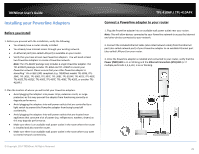
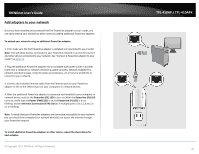
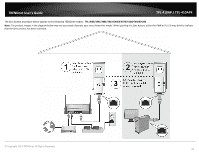
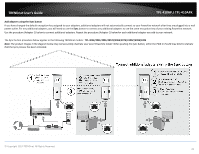
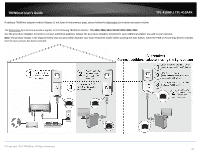
TRENDnet User's Guide Add adapters to your network Once you have installed and connected the first Powerline adapter to your router, you can easily extend your network to other rooms by adding additional Powerline adapters. To extend your network using an additional Powerline adapter: 1. First, make sure the first Powerline adapter is installed and connected to your router. Note: This will allow devices connected to your Powerline network to access the Internet and other devices connected to your network. See "Connect a Powerline adapter to your router" on page 29. 2. Plug the additional Powerline adapter into an available wall power outlet in another room near a computer or network device (e.g. game consoles, network-enabled TVs, network attached storage, network media server/players, etc.) that you would like to connect to your network. 3. Connect the included Ethernet cable from the Ethernet port on your Powerline adapter to the to the Ethernet port of your computers or network devices. 4. After the additional Powerline adapter is connected and installed to your computer or network device, wait for the Powerline (PL) LED to turn on. After the Powerline (PL) LED turns on, verify that the Power (PWR) LED is on, the Powerline (PL) LED is on or blinking, and the Ethernet Connection (ETH) LED (or if multiple ports LEDs 1,2,3,etc.) is on or blinking. Note: To verify that your Powerline adapters are connected successfully to your network, you can check if the computer(s) or network device(s) can access the Internet through your Powerline network. To install additional Powerline adapters in other rooms, repeat the steps above for each adapter. © Copyright 2014 TRENDnet. All Rights Reserved. TPL-410AP / TPL-410APK 30
-
 1
1 -
2
-
3
-
4
-
5
-
6
-
7
-
8
-
9
-
10
-
11
-
12
-
13
-
14
-
15
-
16
-
17
-
18
-
19
-
20
-
21
-
22
-
23
-
24
-
25
-
26
-
 27
27 -
 28
28 -
 29
29 -
 30
30 -
 31
31 -
 32
32 -
 33
33 -
 34
34 -
 35
35 -
 36
36 -
 37
37 -
38
-
39
-
40
-
41
-
42
-
43
-
44
-
45
-
46
-
47
-
48
-
49
-
50
-
51
-
52
-
53
-
54
-
55
-
56
-
57
-
58
-
59
-
60
-
61
-
62
-
63
-
64
-
65
 |
 |
