Tanaka TPS-210 Owner's Manual - Page 1
Tanaka TPS-210 Manual
 |
View all Tanaka TPS-210 manuals
Add to My Manuals
Save this manual to your list of manuals |
Page 1 highlights
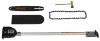
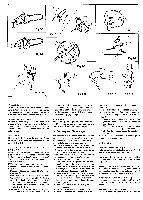
Tanaka® TPS 200H 210 AO, (En, Fr, It, Ge, Sp, Sw) Owner's manual Manuel d'instructions Manule use e manutenzione Bedienungsanleitung Manual del propietario Instruktionsbok 970-32331-204 2003. 3 (T.H.I.) Chain oil (Fig. 2-8) Fill up with chain oil (1). Always use good quality chain oil. When the engine is running, the chain oil is automatically discharged. NOTE! Add chain oil when its level lowers to one centimeter from bottom. (Fig. 2-8) ADJUSTMENT OF CHAIN OIL SUPPLY The chain oil quantity discharged through the lubrication system is factory-adjusted to the standard. Adjust the quantity in accordance with the operating condition. The numbered label (4) describes order of chain oil adjustment. (Fig. 2-9) • Loosen the fixing screw (2) one turn. (Fig. 2-9)19 • Turn the adjusting screw (3) clockwise to decrease the quantity and turn it counterclockwise to increase the quantity. (Fig. 2-10)(D • Do not try to turn the screw (3) clockwise beyond 1 turn from its most counterclockwise position or the maximum quantity discharged position. • After adjustment has been made, tighten fixing screw (2). (Fig. 2-9)0 NOTE! When you have lost the proper position of the screw (3), start with the most counterclockwise position. 3. Pruning techniques This attachment is designed for trimming small limbs and branches up to 8 "in diameter. Follow these tips for successful operation. • Plan cut carefully. Check direction branch will fall. • Long branches should be removed in several pieces. • Do not stand directly beneath branch being cut. • When ready to cut: Hold "front cutting guide" against branch. This will prevent whipping of the branch. DO NOT use back and forth sawing action. (Fig.3-1) • Look out for branch immediately behind the 8 branch being cut. If blade hits rear branch damage to blade may occur. (Fig. 3-2) • Accelerate to full throttle. • Apply a light cutting pressure. • Ease cutting pressure when nearing end of cut to maintain control. • When pruning a limb 4 inch diameter or larger, cut as follows: (Fig. 3-3) 1. Undercut 1/4 limb diameter near tree trunk 2. Finish top cut slightly farther out on limb. 3. Flush cut stub at trunk. • DO NOT use for felling or bucking. of saw dust and debris. Angle transmission (Fig.4-4) Check angle transmission or angle gear for grease level about every 50 hours of operation by removing the grease filler plug on the side of angle transmission. If no grease can be seen on the flanks of the gears, fill the transmission with a quality lithium based multipurpose grease up to 3/4. Do not completely fill the transmission. 1. Avant-propos II importe que vous lisiez et compreniez bien le manuel du proprietaire de la debroussailleuse de TANAKA aussi bien que ce manuel-ci. Veuillez examiner et observer soigneusement toutes les mesures de securite et tous les avertissements. L'emploi negligent ou inapproprie de l'appareil pourrait aboutir a des blessures graves ou fatales. Cet accessoire de perche a sciage a ete concu pour certaines debroussailleuses de TANAKA. 4. Maintenance FONCTIONNEMENT EN SC1RETE Oiler port (Fig. 4-1) Clean the chain oiler port (1) whenever possible. Guide bar (Fig. 4-2) Before using the machine, clean the groove and oiler port (1) in the bar with the special gauge offered as an optional accessory. Side case (Fig. 4-3) Always keep the side case and drive area clean AVERTISSEMENT A DANGER II se peut que tous les conducteurs electriques aeriens et tous les fils de telecommunications aeriens aient du flux electrique a haute tension. Ne jamais toucher directement ou indirectement de fils lors de l'emondage. Dans le cas contraire, des blessures graves ou la mort pourraient s'ensuivre.
-
 1
1 -
 2
2 -
 3
3 -
 4
4 -
 5
5 -
 6
6 -
 7
7 -
8
 |
 |