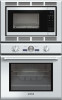
Thermador PODM301J Installation Instructions - Page 15
Oven Installation
 |
View all Thermador PODM301J manuals
Add to My Manuals
Save this manual to your list of manuals |
Page 15 highlights
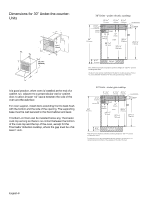
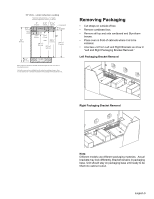
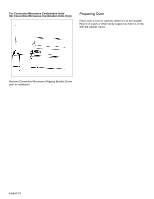
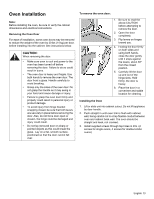
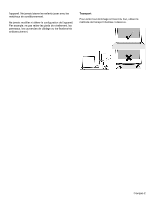
Oven Installation Note: Before installing the oven, be sure to verify the cabinet dimensions and electrical connections. Removing the Oven Door For ease of installation, some oven doors may be removed to reduce the weight of the oven by 30 lbs (14 kg) per door, before installing into the cabinet. See instructions below. CAUTION: When removing the door: • Make sure oven is cool and power to the oven has been turned off before removing the door. Failure to do so could result in burns. • The oven door is heavy and fragile. Use both hands to remove the oven door. The door front is glass. Handle carefully to avoid breaking. • Grasp only the sides of the oven door. Do not grasp the handle as it may swing in your hand and cause damage or injury. • Failure to grasp the oven door firmly and properly could result in personal injury or product damage. • To avoid injury from hinge bracket snapping closed, be sure that both levers are securely in place before removing the door. Also, do not force door open or closed - the hinge could be damaged and injury could result. • Do not lay removed door on sharp or pointed objects as this could break the glass. Lay on a flat, smooth surface, positioned so that the door cannot fall over. To remove the oven door: 1. Be sure to read the above CAUTION before attempting to remove the door. 2. Open the door completely. 3. Flip levers on hinges toward you. 4. Holding the door firmly on both sides and using both hands, close the door gently until it stops against the levers, about 30º from the closed position. 5. Carefully lift the door up and out of the hinge slots. Hold firmly; the door is heavy. 6. Place the door in a convenient and stable location for cleaning. Installing the Oven 1. Lift or slide unit into cabinet cutout. Do not lift appliance by door handle. 2. Push straight in until oven trim is flush with cabinet wall, being careful not to crimp flexible conduit between oven and cabinet back wall. The oven should be straight and level, not crooked. 3. Install supplied screws through tap holes in trim. (2 screws for single ovens, 4 screws for double/combo ovens) English 13
-
 1
1 -
2
-
3
-
4
-
5
-
6
-
7
-
8
-
9
-
 10
10 -
 11
11 -
 12
12 -
 13
13 -
 14
14 -
 15
15 -
 16
16 -
 17
17 -
 18
18 -
 19
19 -
 20
20 -
21
-
22
-
23
-
24
-
25
-
26
-
27
-
28
-
29
-
30
-
31
-
32
-
33
-
34
-
35
-
36
-
37
-
38
-
39
-
40
-
41
-
42
-
43
-
44
-
45
-
46
-
47
-
48
-
49
-
50
-
51
-
52
 |
 |
