Thermador PRD606WCG Instructions for Use - Page 8
Important Safety Instructions
 |
View all Thermador PRD606WCG manuals
Add to My Manuals
Save this manual to your list of manuals |
Page 8 highlights
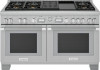
9 IMPORTANT SAFETY INSTRUCTIONS READ AND SAVE THESE INSTRUCTIONS WARNING Before servicing or cleaning the unit, switch power off at service panel and lock service panel. This will prevent power from being switched on accidentally. When the service panel cannot be locked, securely fasten a prominent warning device, such as a tag to the service panel. Gas type verification Natural gas - 7 in. column water (17.4 mb) min., 14 in. (34.9 mb) maximum Propane gas - 11 in. water column (27.4 mb) min., 14 in. (34.9 mb) maximum Verify the type of gas supplied to the location. Ensure that the appliance is connected to the type of gas for which it is certified. Refer to the Data Rating Label. WARNING If a gas conversion kit is used, the kit shall be installed by qualified technician in accordance with the manufacturer's instructions and all applicable codes and requirements of the authority having jurisdiction. If the information in the instructions is not followed exactly, a fire, explosion or production of carbon monoxide may result causing property damage, personal injury or loss of life. The qualified technician is responsible for the proper installation of the kit. The installation is not proper and complete until the operation of the converted appliance is checked as specified in the manufacturer's instructions supplied with the kit. CAUTION When connecting the unit to propane gas, make certain the propane gas tank is equipped with its own high-pressure regulator in addition to the pressure regulator supplied with the appliance. The maximum gas pressure to this appliance must not exceed 14.0'' water column (34.9 mb) from the propane gas tank to the pressure regulator. For Massachusetts installations 1. Installation must be performed by a qualified or licensed contractor, plumber or gas fitter qualified or licensed by the state, province or region where this appliance is being installed. 2. Shut-off valve must be a "T" handle gas cock. 3. Flexible gas connector must not be longer than 36'' (914 mm). Ensure proper installation and servicing. Follow the Installation Instructions provided with this product. Have the appliance installed and electrically grounded by a qualified technician. In the event a burner goes out and gas escapes, open a window or a door. DO NOT attempt to use the appliance until the gas has had time to dissipate. Wait at least 5 minutes before using the appliance. DO NOT repair or replace any part of the appliance unless specifically recommended in this manual. All servicing should be referred to an authorized servicer. Electrical requirements WARNING IN CASE OF AN ELECTRICAL FAILURE If for any reason a gas control knob is turned ON and there is no electrical power to operate the electronic igniters on the burners, turn OFF the gas control knob and wait 5 minutes for the gas to dissipate before lighting the burner manually. To light the burners manually, carefully hold a lighted match to the burner ports and turn the gas control knob to HI. During a power failure, you can use the standard burners, but each must be lit with a match. DO NOT attempt to light the XLO® burners manually. These burners are equipped with the ExtraLow® feature and cannot be lit manually. The appliance must be electrically grounded in accordance with local codes or, in the absence of local codes, with the National Electrical Code, NFPA 70 or the Canadian Electric Code, CSA C22.1-02. Page. 8
-
 1
1 -
2
-
 3
3 -
 4
4 -
 5
5 -
 6
6 -
 7
7 -
 8
8 -
 9
9 -
 10
10 -
 11
11 -
 12
12 -
 13
13 -
14
-
15
-
16
-
17
-
18
-
19
-
20
-
21
-
22
-
23
-
24
-
25
-
26
-
27
-
28
-
29
-
30
-
31
-
32
-
33
-
34
-
35
-
36
-
37
-
38
-
39
-
40
-
41
-
42
-
43
-
44
-
45
-
46
-
47
-
48
-
49
-
50
-
51
-
52
-
53
-
54
-
55
-
56
-
57
-
58
-
59
-
60
-
61
-
62
-
63
-
64
-
65
-
66
-
67
-
68
-
69
-
70
-
71
-
72
-
73
-
74
-
75
-
76
-
77
-
78
-
79
-
80
-
81
-
82
-
83
-
84
-
85
-
86
-
87
-
88
-
89
-
90
-
91
-
92
-
93
-
94
-
95
 |
 |
