Toshiba 24HV10UM Owners Manual - Page 8
Turning the TV on, Learning about the menu system - support
 |
View all Toshiba 24HV10UM manuals
Add to My Manuals
Save this manual to your list of manuals |
Page 8 highlights
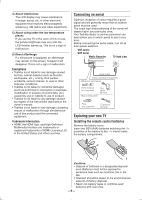
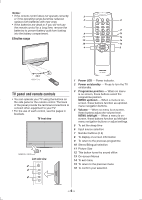
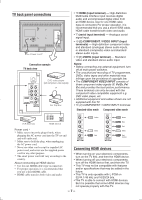
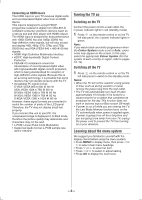
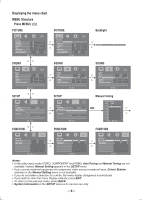
Connecting an HDMI device The HDMI input on your TV receives digital audio and uncompressed digital video from an HDMI device. This input is designed to accept HDCP programme material in digital from CEA-861-D compliant consumer electronic devices (such as a set top box and DVD player with HDMI output). The HDMI input is designed for best performance with 1080i (50/60 Hz) and 1080p (50/60 Hz) high-definition video signals, but will also accept and display 480i, 480p, 576i, 576p, and 720p (50/60 Hz) and VGA (VESA 640 × 480 @ 60 Hz) signals. • HDMI: High-Definition Multimedia Interface • HDCP: High-bandwidth Digital Content Protection • CEA-861-D compliance covers the transmission of uncompressed digital video with high-bandwidth digital content protection, which is being standardized for reception of high-definition video signals. Because this is an evolving technology, it is possible that some devices may not operate properly with the TV. • Acceptable PC signal format: S-VGA: VESA 800 5 600 @ 60 Hz XGA: VESA 1024 5 768 @ 60 Hz W-XGA: VESA 1280 5 768 @ 60 Hz W-XGA: VESA 1360 5 768 @ 60 Hz S-XGA: VESA 1280 5 1024 @ 60 Hz However, these signal formats are converted to match the number of pixels of the LCD panel. Therefore, the TV may not display small text properly. If you connect this unit to your PC, the compressed image is displayed in S-XGA mode, therefore the picture quality may deteriorate and characters may not be read. • L-PCM: Linear-Pulse Code Modulation • Supported Audio format: L-PCM sample rate 32/44,1/48 kHz Turning the TV on Switching on the TV Connect the power cord to a wall outlet, the 1 power indicator lights in red (standby mode). 1 Press on the remote control or on the TV left side panel, the 1 power indicator lights in green. Note: If you watch black and white programmes when the Colour System mode is set to Auto, colour noise may appear on the screen. In this case select the appropriate Colour System (For the system of each country or region, refer to pages 10, 15). Switching off the TV 1 Press on the remote control or on the TV left side panel to switch to the standby mode. Notes: • When the TV will not be used for a long period of time, such as during vacation or travel, remove the power plug from the wall outlet. • The TV will automatically turn itself off after approximately 15 minutes if it is tuned to a vacant channel or a station that completes its broadcast for the day. This function does not work in external input or Blue screen Off mode. • If power is cut off while you are viewing the TV, the Last Mode Memory function turns on the TV automatically when power is applied again. If power is going to be off for a long time and you are going to be away from your TV, unplug the power cord to prevent the TV from turning on in your absence. Learning about the menu system We suggest you familiarize yourself with the display charts before using the menu system: • Press MENU to display menu, then press v or w to select main menu headings. • Press s or r to select an item. • Press v or w to select or adjust setting. • Press OK to display the next menu. - 8 -
-
 1
1 -
2
-
 3
3 -
 4
4 -
 5
5 -
 6
6 -
 7
7 -
 8
8 -
 9
9 -
 10
10 -
 11
11 -
 12
12 -
 13
13 -
14
-
15
-
16
 |
 |