Toshiba 55VX700U User Manual - Page 28
Setting up your TV
 |
View all Toshiba 55VX700U manuals
Add to My Manuals
Save this manual to your list of manuals |
Page 28 highlights
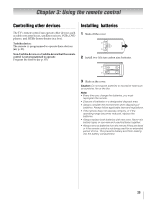
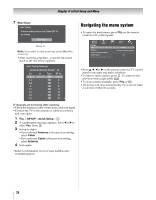
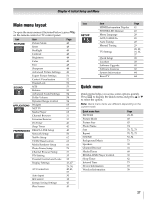
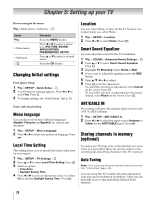
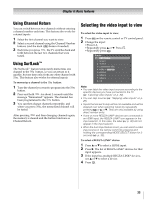
Chapter 5: Setting up your TV How to navigate the menu: Y > Main menu > Submenu > OK Format Y > Main menu > Submenu > OK Description Press the MENU button. Press C or c to select a menu icon (PICTURE, SOUND, APPLICATIONS, PREFERENCES, SETUP) Press B or b to select a desired menu. Press the OK button Changing Initial settings From Quick Setup: 1 Y > SETUP > Quick Setup > . OK 2 A confirmation message appears. Press C or c to select Yes. Press . OK 3 To change settings, see "Initial Setup" (- p. 25). From individual setting: Menu language You can choose from three different languages (English, Français and Español) for menus and messages 1 Y > SETUP > Menu Language. 2 Press C or c to select your preferred language. Press O. Local Time Setting This setting allows you to specify the correct time zone for your region. 1 Y > SETUP > TV Settings > . OK 2 Press B or b to select Local Time Setting. Press . OK 3 Select an option: • Time Zone • Daylight Saving Time 4 Press C or c to set your desire time zone or to select On to activate Daylight Saving Time. Press O. Location You can select Home or Store for the TV location. For normal home use, select Home. 1 Y > SETUP > Location. 2 Press C or c to select Home. Press O Smart Sound Equalizer You can adjust the sound for the TV installation. 1 Y > SOUND > Advanced Sound Settings > . OK 2 Press B or b to select Smart Sound Equalizer. Press . OK 3 Highlight TV Mounting. Select Stand or Wall. 4 If you want to adjust the equalizer, press the RED button. 5 Press B, b, C or c to adjust. 6 Press O to fix the adjustment. To cancel the selection or adjustment, select Cancel on the screen. Press . OK To revert the selection or adjustment to the factory default, select Reset on the screen. Press . OK ANT/CABLE IN This setting configures the antenna input source for the ANT/CABLE terminal. 1 Y > SETUP > ANT/CABLE In. 2 Press C or c to select the input source (Antenna or Cable) for the ANT/CABLE input. Press O. Storing channels in memory (optional) To make your TV stops only on the channels you want when you press < or , on the remote control or the control panel, store those channels in the TV's memory. Auto Tuning Note: You must set up the antenna/cable input source first. See "Initial Setup" (-p. 25). You can set up the TV to detect all active channels in your area and store them in its memory. Then you can manually store or skip individual channels from memory. 28
-
 1
1 -
2
-
3
-
4
-
5
-
6
-
7
-
8
-
9
-
10
-
11
-
12
-
13
-
14
-
15
-
16
-
17
-
18
-
19
-
20
-
21
-
22
-
 23
23 -
 24
24 -
 25
25 -
 26
26 -
 27
27 -
 28
28 -
 29
29 -
 30
30 -
 31
31 -
 32
32 -
 33
33 -
34
-
35
-
36
-
37
-
38
-
39
-
40
-
41
-
42
-
43
-
44
-
45
-
46
-
47
-
48
-
49
-
50
-
51
-
52
-
53
-
54
-
55
-
56
-
57
-
58
-
59
-
60
-
61
-
62
-
63
-
64
-
65
-
66
-
67
-
68
-
69
-
70
-
71
-
72
-
73
-
74
-
75
-
76
-
77
-
78
-
79
-
80
-
81
-
82
-
83
-
84
-
85
-
86
-
87
-
88
-
89
-
90
-
91
-
92
-
93
-
94
-
95
-
96
-
97
-
98
-
99
-
100
 |
 |
