Toshiba 55VX700U User Manual - Page 57
Manual Setup, Enhanced 11n
 |
View all Toshiba 55VX700U manuals
Add to My Manuals
Save this manual to your list of manuals |
Page 57 highlights
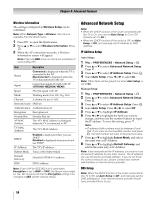
Chapter 8: Advanced features Manual Setup 1 Y > PREFERENCES > Network Setup > . OK 2 Press B or b to select Wireless Setup. Press . OK 3 Press B or b to select Manual Setup. Press . OK 4 Press B or b to select Network Name. Press . OK The Software Keyboard window appears. 5 Input the Network Name by using the Software Keyboard (- p. 60). To save your setting, press the BLUE button. 6 Press B or b to highlight Authentication. Press C or c to select Open System, Shared Key, WPAPSK or WPA2-PSK. 7 Press B or b to highlight Encryption. Press C or c to select None, WEP, TKIP or AES. Note: • Certain encryption types are only compatible with specific authentication types. -When Authentication is Open System, only WEP or None are compatible. -When Authentication is Shared Key, only WEP is compatible. -When Authentication is WPA-PSK or WPA2-PSK, only TKIP or AES are compatible. • When incompatible Authentication/Encryption pairings are attempted, a warning message will be displayed, and no connection attempt will be made until the incompatibility is resolved. 8 Press B or b to select Security Key. Press OK . The Software Keyboard window appears. 9 Input the Security Key by using the Software Keyboard (- p. 60). To save your setting, press the BLUE button. Note: This item is grayed out when Encryption is None. 10 Press B or b to highlight Key ID. Press C or c to select 1, 2, 3 or 4. Note: When Encryption is set to WEP, this option is available. 11 Select Done. Press . OK Note: When Encryption is None, a message will appear. Press C or c to select Yes and press . OK Note: Settings are not saved if Done is selected. is pressed before Enhanced 11n When Enhanced 11n is set to On, these features are available. •Dual Channel (40MHz) •GF (Green Field) Note: In addition, some 11n's option feature become effective. 1 Y > PREFERENCES > Network Setup > . OK 2 Press B or b to select Wireless Setup. Press . OK 3 Press B or b to highlight Enhanced 11n. Press C or c to select On. 57
-
 1
1 -
2
-
3
-
4
-
5
-
6
-
7
-
8
-
9
-
10
-
11
-
12
-
13
-
14
-
15
-
16
-
17
-
18
-
19
-
20
-
21
-
22
-
23
-
24
-
25
-
26
-
27
-
28
-
29
-
30
-
31
-
32
-
33
-
34
-
35
-
36
-
37
-
38
-
39
-
40
-
41
-
42
-
43
-
44
-
45
-
46
-
47
-
48
-
49
-
50
-
51
-
 52
52 -
 53
53 -
 54
54 -
 55
55 -
 56
56 -
 57
57 -
 58
58 -
 59
59 -
 60
60 -
 61
61 -
 62
62 -
63
-
64
-
65
-
66
-
67
-
68
-
69
-
70
-
71
-
72
-
73
-
74
-
75
-
76
-
77
-
78
-
79
-
80
-
81
-
82
-
83
-
84
-
85
-
86
-
87
-
88
-
89
-
90
-
91
-
92
-
93
-
94
-
95
-
96
-
97
-
98
-
99
-
100
 |
 |