Toshiba 62HM95 Owner's Manual - English - Page 5

Contents - picture dark

Page 5 highlights

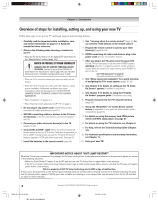
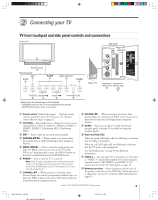
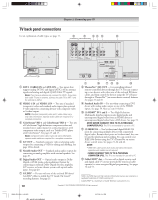
Important notes about your DLPTM projection TV 1) The light source for this TV is a projection lamp unit with a limited service life. When the lamp wears out, the picture may become dark or black or the lamp may fail, at which time you must replace the lamp unit. See "Lamp unit replacement and care" on pages 103-105. 2) If you set the lamp mode to Low Power, each time you turn on the TV, the lamp will start out in High Bright mode but will switch to Low Power mode in approximately 1 minute. You will notice a change in screen brightness when this happens. This is normal and is not a sign of malfunction. (See page 75 for details.) 3) Each time you turn on the TV, it may take several minutes for the picture to obtain full brightness. 4) This TV's display is manufactured using an extremely high level of precision technology; however, an occasional pixel (dot of light) may show constantly on the screen. This is a structural property of DLP™ (Digital Light Processing™) technology in the TV and is not a sign of malfunction. Such pixels are not visible when the picture is viewed from a normal viewing distance (see item 29 on page 4). 5) Depending on the media you are viewing, it is possible, although unlikely, that a limited number of viewers may see a "rainbow effect" on the screen, which can, in rare instances, result in eye fatigue. This is a rare occurrence related to technology of this type and is not a sign of TV malfunction. 6) Always sit approximately 10-25 feet away from the TV and as directly in front of it as possible. The picture quality may be affected by your viewing position and length of viewing time. If you sit too closely to the TV for too long, you may suffer from eye fatigue. See item 29 on page 4. 7) This TV contains several cooling fans to moderate the internal temperature. You may be able to hear the fans for several minutes after the TV is turned off. This is a function of the Quick Restart™ feature and is not a sign of TV malfunction. You can set the Quick Restart™ feature to stop the fans as soon as the TV is turned off. See "Setting the Quick Restart™ feature" on page 51. 8) The green and red LED lights at the bottom center of the TV front indicate your TV's current status. If either light flashes, see "LED indications" on page 99 for details. 9) If you unplug the power cord, when you plug the power cord in again the message "Now Booting..." will display on-screen until the picture appears, or the green LED will blink until the TV enters standby mode (plugged in but not powered on). This is normal and is not a sign of malfunction. 10) When connecting an external A/V device, if you connect the device's video output to the TV and the device's audio output to a separate audio system, the picture and sound may not synchronize completely. 11) When playing a video game on this TV, there may be a slight delay between your command (e.g., joystick, keyboard) and the picture movement on the screen. Contents Important Safety Information 2-4 Important notes about your DLP™ projection TV 5 Chapter 1: Introduction 7 Welcome to Toshiba 7 Features of your new TV 7 Overview of steps for installing, setting up, and using your new TV 8 Chapter 2: Connecting your TV 9 TV front touchpad and side panel controls and connections 9 TV back panel connections 10 Overview of cable types 11 About the connection illustrations 12 Connecting a digital CableCARD 12 Connecting a VCR and antenna or Cable TV (no Cable box 13 Connecting a camcorder 13 Connecting a VCR and Cable box 14 Connecting a VCR and satellite receiver 15 Connecting a DVD player with S-video, a VCR, and a Cable box 16 Connecting a DVD player with ColorStream® (component video) and a VCR 17 Connecting two VCRs 18 Connecting an HDMI™ or a DVI device to the HDMI input 19 Connecting a digital audio system 20 Connecting an analog audio system 20 HM95_R1_005-06_061505 5 Controlling infrared remote-controlled devices through the TV (IR pass-through 21 Connecting IEEE1394 video devices 22 Using analog-compatible IEEE1394 devices 22 Supported signals 22 Using TheaterNet™ on-screen device control 22 Connecting an AVHD or D-VHS recorder 23 IEEE1394 device initialization 23 IEEE1394 device management 24 G-LINK® connection 25 Chapter 3: Using the remote control 26 Learning about the remote control 26 Installing the remote control batteries 28 Using the remote control MODE button to control your other devices 28 Remote Control functional key chart 29 Programming the remote control to operate your other devices 31 Multi-brand remote control device codes 33 Chapter 4: Menu layout and navigation 35 Main menu layout 35 Setup/Installation menu layout 36 Navigating the menu system 36 Chapter 5: TV Guide On Screen® setup 37 Setting up the TV Guide On Screen® system 37 TV Guide On Screen® Reminder 40 Turning off the TV Guide On Screen® automatic display feature 40 (Continued on next page) 5 6/24/05, 7:48 PM

  • 1
  • 2
  • 3
  • 4
  • 5
  • 6
  • 7
  • 8
  • 9
  • 10
  • 11
  • 12
  • 13
  • 14
  • 15
  • 16
  • 17
  • 18
  • 19
  • 20
  • 21
  • 22
  • 23
  • 24
  • 25
  • 26
  • 27
  • 28
  • 29
  • 30
  • 31
  • 32
  • 33
  • 34
  • 35
  • 36
  • 37
  • 38
  • 39
  • 40
  • 41
  • 42
  • 43
  • 44
  • 45
  • 46
  • 47
  • 48
  • 49
  • 50
  • 51
  • 52
  • 53
  • 54
  • 55
  • 56
  • 57
  • 58
  • 59
  • 60
  • 61
  • 62
  • 63
  • 64
  • 65
  • 66
  • 67
  • 68
  • 69
  • 70
  • 71
  • 72
  • 73
  • 74
  • 75
  • 76
  • 77
  • 78
  • 79
  • 80
  • 81
  • 82
  • 83
  • 84
  • 85
  • 86
  • 87
  • 88
  • 89
  • 90
  • 91
  • 92
  • 93
  • 94
  • 95
  • 96
  • 97
  • 98
  • 99
  • 100
  • 101
  • 102
  • 103
  • 104
  • 105
  • 106
  • 107
  • 108
  • 109
  • 110
  • 111
  • 112

5
(E) 46/52/62HM95
Contents
Important Safety Information
.............................................
2-4
Important notes about your DLP™ projection TV
...............
5
Chapter 1: Introduction
..........................................................
7
Welcome to Toshiba
...........................................................
7
Features of your new TV
....................................................
7
Overview of steps for installing, setting up, and
using your new TV
......................................................
8
Chapter 2: Connecting your TV
............................................
9
TV front touchpad and side panel controls
and connections
.............................................................
9
TV back panel connections
................................................
10
Overview of cable types
......................................................
11
About the connection illustrations
......................................
12
Connecting a digital CableCARD
....................................
12
Connecting a VCR and antenna or Cable TV
(no Cable box)
...............................................................
13
Connecting a camcorder
.....................................................
13
Connecting a VCR and Cable box
.....................................
14
Connecting a VCR and satellite receiver
.............................
15
Connecting a DVD player with S-video, a VCR,
and a Cable box
..............................................................
16
Connecting a DVD player with ColorStream
®
(component video) and a VCR
.......................................
17
Connecting two VCRs
.......................................................
18
Connecting an HDMI
or a DVI device to the
HDMI input
..................................................................
19
Connecting a digital audio system
......................................
20
Connecting an analog audio system
....................................
20
Controlling infrared remote-controlled devices
through the TV (IR pass-through)
..................................
21
Connecting IEEE1394 video devices
..................................
22
Using analog-compatible IEEE1394 devices
...................
22
Supported signals
...........................................................
22
Using TheaterNet
on-screen device control
..................
22
Connecting an AVHD or D-VHS recorder
....................
23
IEEE1394 device initialization
.......................................
23
IEEE1394 device management
.......................................
24
G-LINK
®
connection
.........................................................
25
Chapter 3: Using the remote control
.................................
26
Learning about the remote control
.....................................
26
Installing the remote control batteries
.................................
28
Using the remote control MODE button to control
your other devices
...........................................................
28
Remote Control functional key chart
.................................
29
Programming the remote control to operate
your other devices
...........................................................
31
Multi-brand remote control device codes
............................
33
Chapter 4: Menu layout and navigation
...........................
35
Main menu layout
..............................................................
35
Setup/Installation menu layout
...........................................
36
Navigating the menu system
...............................................
36
Chapter 5: TV Guide On Screen
®
setup
.............................
37
Setting up the TV Guide On Screen
®
system
.....................
37
TV Guide On Screen
®
Reminder
.......................................
40
Turning off the TV Guide On Screen
®
automatic display feature
................................................
40
(Continued on next page)
HM95_R1_005-06_061505
6/24/05, 7:48 PM
5
Important notes about your DLP
TM
projection TV
1)
The light source for this TV is a projection lamp unit with a
limited service life. When the lamp wears out, the picture may
become dark or black or the lamp may fail, at which time you
must replace the lamp unit. See
Lamp unit replacement and
care
on pages
103
105
.
2)
If you set the lamp mode to Low Power, each time you turn on
the TV, the lamp will start out in High Bright mode but will
switch to Low Power mode in approximately 1 minute. You will
notice a change in screen brightness when this happens. This is
normal and is not a sign of malfunction. (See page
75
for
details.)
3) E
ach
time you turn on the TV, it may take several minutes for
the picture to obtain full brightness.
4)
This TV
s display is manufactured using an extremely high level
of precision technology; however, an occasional pixel (dot of
light) may show constantly on the screen. This is a structural
property of DLP
(Digital Light Processing
) technology in the
TV and is not a sign of malfunction. Such pixels are not visible
when the picture is viewed from a normal viewing distance (see
item 29 on page 4).
5)
Depending on the media you are viewing, it is possible, although
unlikely, that a limited number of viewers may see a
rainbow
effect
on the screen, which can, in rare instances, result in eye
fatigue. This is a rare occurrence related to technology of this
type and is not a sign of TV malfunction.
6)
Always sit approximately 10
25 feet away from the TV and as
directly in front of it as possible. The picture quality may be
affected by your viewing position and length of viewing time.
If
you sit too closely to the TV for too long, you may suffer from
eye fatigue. See item 29 on page 4.
7)
This TV contains several cooling fans to moderate the
internal temperature. You may be able to hear the fans
for several minutes after the TV is turned off. This is a
function of the Quick Restart
feature and is not a sign of TV
malfunction. You can set the Quick Restart
feature to stop the
fans as soon as the TV is turned off. See
Setting the Quick
Restart
feature
on page
51
.
8) The
green and red
LED lights at the bottom center of the TV
front indicate your TV
s current status. If either light flashes, see
LED indications
on page
99
for details.
9)
If you unplug the power cord, when you plug the power cord in
again the message
Now Booting
…”
will display on
-
screen
until the picture appears
,
or the
green
LED will blink until the
TV
enters standby mode (plugged in but not powered on).
This is
normal and is not a sign of malfunction.
10)
When connecting an external A/V device, if you connect the
device
s video output to the TV and the device
s audio output
to
a separate audio system, the picture and sound may not
synchronize completely.
11)
When playing a video game on this TV, there may be a slight
delay between your command (e.g., joystick, keyboard) and the
picture movement on the screen.