Toshiba BDX1100KU Owners Manual - Page 19
Audio Setting
 |
View all Toshiba BDX1100KU manuals
Add to My Manuals
Save this manual to your list of manuals |
Page 19 highlights
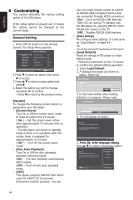
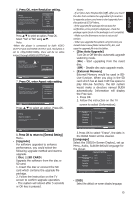
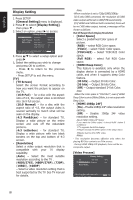
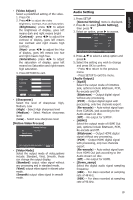
English • [Video Adjust] Select a predefined setting of the video. 1. Press OK . 2. Press/ to adjust the video Brightness, Contrast, Hue and Saturation. {Brightness}- press t/ to adjust the brightness of display, goes left means dark and right means bright {Contrast}- press t/ to adjust the contrast of display, goes left means low contrast and right means high contrast. {Hue}- press t/ to adjust the Hue of display, goes left means low hue and right means high hue. {Saturation}- press t/ to adjust the saturation of display, goes left means low Saturation and right means high saturation. 3. Press RETURN to exit. Brightness Contrast Hue Saturation Change RETURN Exit • [Sharpness] Select the level of sharpness: High, Medium, Low {High} - Select High sharpness level {Medium} - Select Medium sharpness level {Low} - Select Low sharpness level [Motion Video Process] ... Display Setting... TV Video Process Motion Video... Video Mode Move cursor key to select menu option then use "OK" key to select SETUP Exit • [Video Mode] Select the output mode of video,options include: Standard, Vivid, Smooth, these can change the output display. {Standard} output video signal without any processing and in standard mode. {Vivid} output video signal in vibrant color mode. {Smooth} output video signal in smooth mode. Audio Setting 1. Press SETUP [General Setting] menu is displayed. 2. Press to select [Audio Setting], then press . 3. Select an option, press to access. ... Audio Setting... Audio Output Spdif PCM HDMI PCM Down_samp 48K DRC Off Move cursor key to select menu option then use "OK" key to select SETUP Exit 4. Press / to select a setup option and press 5. Select the setting you wish to change and press OK to confirm. - Press to return to the previous menu. - Press SETUP to exit the menu. [Audio Output] • [Spdif] Select the output mode of COAXIAL jack, options include Bitstream, PCM, Re-encode and Off. {Bitstream} - Output digital signal without any processing. {PCM} - Output digital signal with processing, only two channels export. {Re-encode} - Auto select signal type from COAXIAL jack according to the Audio stream on disc. {Off} - No output for S/PDIF. • [HDMI] Select the output mode of HDMI Out jack, options include Bitstream, PCM, Re-encode and Off. {Bitstream} - Output HDMI digital signal without any processing. {PCM} - Output HDMI digital signal with processing, only two channels export. {Re-encode} - Auto select signal type from HDMI Out jack according to the Audio stream on disc. {Off} - No output for HDMI. • [Down_samp] Select the digital audio signal sampling frequency. {48K} - For discs recorded at sampling rate of 48 kHz. {96K} - For discs recorded at sampling rate of 96 kHz. 19
-
 1
1 -
2
-
3
-
4
-
5
-
6
-
7
-
8
-
9
-
10
-
11
-
12
-
13
-
 14
14 -
 15
15 -
 16
16 -
 17
17 -
 18
18 -
 19
19 -
 20
20 -
 21
21 -
 22
22 -
 23
23 -
 24
24 -
25
-
26
-
27
-
28
-
29
-
30
-
31
-
32
-
33
-
34
-
35
-
36
-
37
-
38
-
39
-
40
-
41
-
42
-
43
-
44
-
45
-
46
 |
 |
