Toshiba DP30A Instruction Manual - Page 34
Installation - ik de
 |
UPC - 032017546370
View all Toshiba DP30A manuals
Add to My Manuals
Save this manual to your list of manuals |
Page 34 highlights
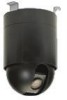
9. Installation JK-H01A is a housing for ceiling mount of the Toshiba dome camera. 1. IK-DP30A Installation procedure (1) Carefully inspect to insure all parts are present and remove all parts from the box. (2) A template is included for ease in cutting the mounting hole. First, locate a position in the ceiling for a 9.020.08" (2292mm) hole to be Lock drilled. Trace around the template, screw then cut a hole in the ceiling following the trace lines. [Note: The thickness of a ceiling to which this housing can be attached is 0.08- 1.77" (2-45mm).] (3) Remove the dome cover. To separate the dome cover from the housing, turn the cover to the left with both hands. This dome cover Fig-1 is connected to the top housing with the wire. Fig-1 (4) Loosen the lock screw according to ceiling board thickness for attaching to the ceiling. (5) Install the camera mounting screws that came with the camera. Do not fully tighten the screws. Lock screw Downloaded from www.Manualslib.com manuals search engine - 34 -
-
 1
1 -
2
-
3
-
4
-
5
-
6
-
7
-
8
-
9
-
10
-
11
-
12
-
13
-
14
-
15
-
16
-
17
-
18
-
19
-
20
-
21
-
22
-
23
-
24
-
25
-
26
-
27
-
28
-
 29
29 -
 30
30 -
 31
31 -
 32
32 -
 33
33 -
 34
34 -
 35
35 -
 36
36 -
 37
37 -
 38
38 -
 39
39 -
40
 |
 |
