Toshiba Portege Z930-S9312 User Guide - Page 47
Recovering to a custom size partition, Recover without changing the hard drive partitions
 |
View all Toshiba Portege Z930-S9312 manuals
Add to My Manuals
Save this manual to your list of manuals |
Page 47 highlights
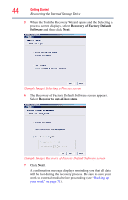
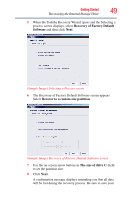
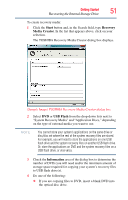
Getting Started 47 Recovering the Internal Storage Drive 6 The Recovery of Factory Default Software screen appears. Select Recover without changing the hard drive partitions. (Sample Image) Recovery of Factory Default Software screen 7 Click Next. A confirmation message displays reminding you that all data on the C: drive will be lost during the recovery process. Be sure to save your work to external media before proceeding (see "Backing up your work" on page 71). 8 Click Next to begin the recovery. When the process is complete, a message displays, indicating that the C: drive has been recovered. 9 Press any key on the keyboard to restart the computer. Recovering to a custom size partition Recovering to a custom size partition deletes all partitions on the drive and all information stored in those partitions. Be sure to save your work to external media before executing the recovery. For more information, see "Backing up your work" on page 71. NOTE During the recovery process it is strongly recommended that your computer be connected to an external power source via the AC adaptor. The "Recover to a custom size partition" option restores your C: drive to its out-of-box state, and allows you to specify the size for
-
 1
1 -
2
-
3
-
4
-
5
-
6
-
7
-
8
-
9
-
10
-
11
-
12
-
13
-
14
-
15
-
16
-
17
-
18
-
19
-
20
-
21
-
22
-
23
-
24
-
25
-
26
-
27
-
28
-
29
-
30
-
31
-
32
-
33
-
34
-
35
-
36
-
37
-
38
-
39
-
40
-
41
-
 42
42 -
 43
43 -
 44
44 -
 45
45 -
 46
46 -
 47
47 -
 48
48 -
 49
49 -
 50
50 -
 51
51 -
 52
52 -
53
-
54
-
55
-
56
-
57
-
58
-
59
-
60
-
61
-
62
-
63
-
64
-
65
-
66
-
67
-
68
-
69
-
70
-
71
-
72
-
73
-
74
-
75
-
76
-
77
-
78
-
79
-
80
-
81
-
82
-
83
-
84
-
85
-
86
-
87
-
88
-
89
-
90
-
91
-
92
-
93
-
94
-
95
-
96
-
97
-
98
-
99
-
100
-
101
-
102
-
103
-
104
-
105
-
106
-
107
-
108
-
109
-
110
-
111
-
112
-
113
-
114
-
115
-
116
-
117
-
118
-
119
-
120
-
121
-
122
-
123
-
124
-
125
-
126
-
127
-
128
-
129
-
130
-
131
-
132
-
133
-
134
-
135
-
136
-
137
-
138
-
139
-
140
-
141
-
142
-
143
-
144
-
145
-
146
-
147
-
148
-
149
-
150
-
151
-
152
-
153
-
154
-
155
-
156
-
157
-
158
-
159
-
160
-
161
-
162
-
163
-
164
-
165
-
166
-
167
-
168
-
169
-
170
-
171
-
172
-
173
-
174
-
175
-
176
-
177
-
178
-
179
-
180
-
181
-
182
-
183
 |
 |
