Toshiba RD-XS32SU Owners Manual - Page 113
Press, to select, Same Disc, Confirm picture and sound rates., Press ENTER.
 |
View all Toshiba RD-XS32SU manuals
Add to My Manuals
Save this manual to your list of manuals |
Page 113 highlights
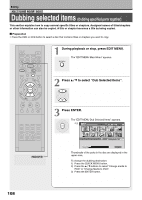
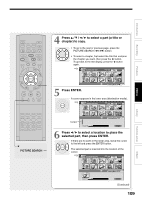
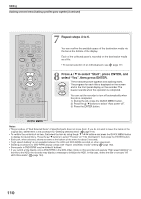
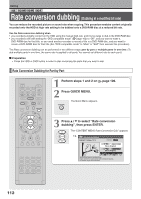
Introduction Recording Playback IP FRAME Editing OPEN/CLOSE DVD TOP MENU MENU RETURN ANGLE SUBTITLE AUDIO CHANNEL HDD TIMESLIP DVD EASY NAVI INSTANT REPLAY INSTANT SKIP REC MENU EDIT MENU LIBRARY CONTENT MENU OW SK SL SEARCH ENTER /ADJUST PAUSE STOP PICTURE PLAY REC QUICK MENU REMAIN DISPLAY TIME BAR CHP DIVIDE DIMMER FL SELECT ZOOM P in P TV PROGRESSIVE TV/VIDEO CHANNEL VOLUME INPUT SELECT QUICK MENU 4 Press / to select "Copy" or "Same Disc". Copy: After the operation is completed, a specified part will remain on the disc where it was previously located. ENTER Same Disc: A part will be copied to the same disc and the copied part will become another title. 5 Confirm picture and sound rates. QUICK MENU ENTER To make changes, follow the procedure below. 1) Press the QUICK MENU button to display the Quick Menu. e.g. CONTENT MENU Rate conversion dubbing Quick Menu 2 0 0 4 / 0A6V/ 1 r1ec0o8 :r0d0qp umalTitVy: 1 2 Auto rate selection Auto power off Exit (0:52:40) Original Copy (Saves Original) Same Disc (Saves Original) 2) Press the / buttons to select an item then press the ENTER button. AV record quality: The current settings you have made ( page 161) are listed. Press the ADJUST ( / ) button to select a desired setting. Auto rate selection: The recorder automatically selects the highest possible rate, calculating from current unoccupied volume on the disc. (This operation does not insure full recording of any length program or whole use of unoccupied volume.) 6 Press ENTER. Copying starts. To confirm the job progress, press the TIME BAR button to display the time bar. (The time bar cannot be copied.) ENTER When copying is completed, the buzzer sounds and the current broadcast picture appears. Pictures and sounds displayed during copying are for monitoring purposes only. Recorded picture quality may vary. Library Function setup Others 113
-
 1
1 -
2
-
3
-
4
-
5
-
6
-
7
-
8
-
9
-
10
-
11
-
12
-
13
-
14
-
15
-
16
-
17
-
18
-
19
-
20
-
21
-
22
-
23
-
24
-
25
-
26
-
27
-
28
-
29
-
30
-
31
-
32
-
33
-
34
-
35
-
36
-
37
-
38
-
39
-
40
-
41
-
42
-
43
-
44
-
45
-
46
-
47
-
48
-
49
-
50
-
51
-
52
-
53
-
54
-
55
-
56
-
57
-
58
-
59
-
60
-
61
-
62
-
63
-
64
-
65
-
66
-
67
-
68
-
69
-
70
-
71
-
72
-
73
-
74
-
75
-
76
-
77
-
78
-
79
-
80
-
81
-
82
-
83
-
84
-
85
-
86
-
87
-
88
-
89
-
90
-
91
-
92
-
93
-
94
-
95
-
96
-
97
-
98
-
99
-
100
-
101
-
102
-
103
-
104
-
105
-
106
-
107
-
 108
108 -
 109
109 -
 110
110 -
 111
111 -
 112
112 -
 113
113 -
 114
114 -
 115
115 -
 116
116 -
 117
117 -
 118
118 -
119
-
120
-
121
-
122
-
123
-
124
-
125
-
126
-
127
-
128
-
129
-
130
-
131
-
132
-
133
-
134
-
135
-
136
-
137
-
138
-
139
-
140
-
141
-
142
-
143
-
144
-
145
-
146
-
147
-
148
-
149
-
150
-
151
-
152
-
153
-
154
-
155
-
156
-
157
-
158
-
159
-
160
-
161
-
162
-
163
-
164
-
165
-
166
-
167
-
168
-
169
-
170
-
171
-
172
-
173
-
174
-
175
-
176
-
177
-
178
-
179
 |
 |
