Toshiba RD-XS32SU Owners Manual - Page 119
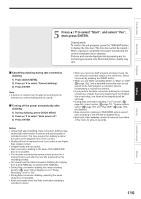
Following steps 4 to 6 on, assemble the items to delete., Press, repeatedly to select,
 |
View all Toshiba RD-XS32SU manuals
Add to My Manuals
Save this manual to your list of manuals |
Page 119 highlights
Introduction Recording Playback IP FRAME LIBRARY OW CONTENT MENU SK SL SEARCH ENTER /ADJUST PAUSE STOP PICTURE PLAY REC QUICK MENU 4 Following steps 4 to 6 on page 109, assemble the items to delete. 5 Press repeatedly to select "Start", then press ENTER. The recorder begins the deletion process. To cancel deleting, press the / buttons to select ENTER "No", then press the ENTER button. When the process is finished, the "EDIT MENU Main Menu" returns. REMAIN DISPLAY TIME BAR CHP DIVIDE DIMMER FL SELECT ZOOM P in P QUICK MENU TV PROGRESSIVE Notes • To confirm the first and last scenes of an item, first select an item then press the QUICK MENU button. Press the / buttons to select "Preview" (or "Title information") then press the ENTER button. This is available only on contents recorded in the HDD or DVD-RAM discs. • Titles and chapters show their names for about 2 seconds at the bottom of the screen when they are selected. • On a DVD-RW disc, deleting can restore the disc space only by deleting the last recorded title. • Deleting cannot be canceled once started. Be careful when executing the deletion process. • If you select a title for the part to be removed, you cannot select chapters in that title. • Chapters in DVD-R/RW discs cannot be selected to delete. Editing Library Function setup Others 119
-
 1
1 -
2
-
3
-
4
-
5
-
6
-
7
-
8
-
9
-
10
-
11
-
12
-
13
-
14
-
15
-
16
-
17
-
18
-
19
-
20
-
21
-
22
-
23
-
24
-
25
-
26
-
27
-
28
-
29
-
30
-
31
-
32
-
33
-
34
-
35
-
36
-
37
-
38
-
39
-
40
-
41
-
42
-
43
-
44
-
45
-
46
-
47
-
48
-
49
-
50
-
51
-
52
-
53
-
54
-
55
-
56
-
57
-
58
-
59
-
60
-
61
-
62
-
63
-
64
-
65
-
66
-
67
-
68
-
69
-
70
-
71
-
72
-
73
-
74
-
75
-
76
-
77
-
78
-
79
-
80
-
81
-
82
-
83
-
84
-
85
-
86
-
87
-
88
-
89
-
90
-
91
-
92
-
93
-
94
-
95
-
96
-
97
-
98
-
99
-
100
-
101
-
102
-
103
-
104
-
105
-
106
-
107
-
108
-
109
-
110
-
111
-
112
-
113
-
 114
114 -
 115
115 -
 116
116 -
 117
117 -
 118
118 -
 119
119 -
 120
120 -
 121
121 -
 122
122 -
 123
123 -
 124
124 -
125
-
126
-
127
-
128
-
129
-
130
-
131
-
132
-
133
-
134
-
135
-
136
-
137
-
138
-
139
-
140
-
141
-
142
-
143
-
144
-
145
-
146
-
147
-
148
-
149
-
150
-
151
-
152
-
153
-
154
-
155
-
156
-
157
-
158
-
159
-
160
-
161
-
162
-
163
-
164
-
165
-
166
-
167
-
168
-
169
-
170
-
171
-
172
-
173
-
174
-
175
-
176
-
177
-
178
-
179
 |
 |
