Toshiba RD-XS32SU Owners Manual - Page 40
Programing a recording REC MENU
 |
View all Toshiba RD-XS32SU manuals
Add to My Manuals
Save this manual to your list of manuals |
Page 40 highlights
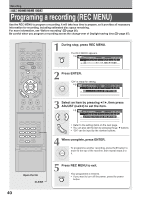
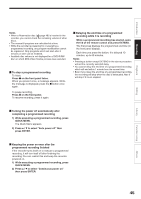
Recording HDD DVD-RAM DVD-RW DVD-R Programing a recording (REC MENU) Use the REC MENU to program a recording. It will take less time to prepare, as it provides all necessary information for recording, including estimated disc space remaining. For more information, see "Before recording" ( page 26). Be careful when you program a recording across the change-over of Daylight-saving time ( page 27). IP FRAME OPEN/CLOSE DVD TOP MENU MENU RETURN ANGLE SUBTITLE AUDIO CHANNEL HDD TIMESLIP DVD EASY NAVI INSTANT REPLAY INSTANT SKIP REC MENU EDIT MENU LIBRARY CONTENT MENU OW SK SL SEARCH ENTER /ADJUST PAUSE STOP PICTURE PLAY RRECC QUICK MENU VCR Plus+ EXTEND REC MODE TV CODE T.SEARCH 1 2 3 CLEAR 4 5 6 DELETE 7 8 9 SETUP ENTER 0 +10 1 During stop, press REC MENU. REC MENU The REC MENU appears. e.g. REC MENU Timer Programing Exec CH Date Start 1/ 1 End Media 4/3 (Sa) 9:00 pm Video Audio Disc am-- - - - am HDD SP 4.6 D/M1 2 Press ENTER. "CH" is ready for setting. e.g. REC MENU Timer Programing 1/ 1 4/3 (Sa) 9:00 pm ENTER Exec CH Date Start End Media Video Audio Disc am - - - - am HDD SP 4.6 D/M1 3 Select an item by pressing / , then press ADJUST ( / ) to set the item. e.g. REC MENU Timer Programing Exec CH Date Start 1/ 1 4/3 (Sa) 9:00 pm End Media Video Audio Disc ENTER 23 4/10 (Sa) 7 00 pm 8 00 pm DVD SP 4.6 D/M1 FRAME • Refer to the setting items on the next page. • You can also set the item by pressing the / buttons. /ADJUST • "CH" can be input by the number buttons. 4 When complete, press ENTER. To programme another recording, press the button to move to the top of the next line, then repeat steps 2 to ENTER 4. Open the lid. CLEAR 5 Press REC MENU to exit. REC MENU Your programme is entered. • If you want to turn off the power, press the power button. 40
-
 1
1 -
2
-
3
-
4
-
5
-
6
-
7
-
8
-
9
-
10
-
11
-
12
-
13
-
14
-
15
-
16
-
17
-
18
-
19
-
20
-
21
-
22
-
23
-
24
-
25
-
26
-
27
-
28
-
29
-
30
-
31
-
32
-
33
-
34
-
 35
35 -
 36
36 -
 37
37 -
 38
38 -
 39
39 -
 40
40 -
 41
41 -
 42
42 -
 43
43 -
 44
44 -
 45
45 -
46
-
47
-
48
-
49
-
50
-
51
-
52
-
53
-
54
-
55
-
56
-
57
-
58
-
59
-
60
-
61
-
62
-
63
-
64
-
65
-
66
-
67
-
68
-
69
-
70
-
71
-
72
-
73
-
74
-
75
-
76
-
77
-
78
-
79
-
80
-
81
-
82
-
83
-
84
-
85
-
86
-
87
-
88
-
89
-
90
-
91
-
92
-
93
-
94
-
95
-
96
-
97
-
98
-
99
-
100
-
101
-
102
-
103
-
104
-
105
-
106
-
107
-
108
-
109
-
110
-
111
-
112
-
113
-
114
-
115
-
116
-
117
-
118
-
119
-
120
-
121
-
122
-
123
-
124
-
125
-
126
-
127
-
128
-
129
-
130
-
131
-
132
-
133
-
134
-
135
-
136
-
137
-
138
-
139
-
140
-
141
-
142
-
143
-
144
-
145
-
146
-
147
-
148
-
149
-
150
-
151
-
152
-
153
-
154
-
155
-
156
-
157
-
158
-
159
-
160
-
161
-
162
-
163
-
164
-
165
-
166
-
167
-
168
-
169
-
170
-
171
-
172
-
173
-
174
-
175
-
176
-
177
-
178
-
179
 |
 |
