Toshiba SD-3109 Owners Manual - Page 20
Pi ying, a Disc
 |
View all Toshiba SD-3109 manuals
Add to My Manuals
Save this manual to your list of manuals |
Page 20 highlights
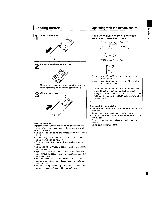
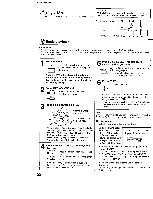
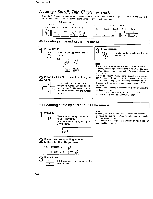
Basic playback Pi ying a Disc This section shows you the basics on how to play a disc. CAUTION Keep your fingers well clear of the disc tray as it is closing. Neglecting to do so may cause serious personal injury. 1 POWER indicator 3 2, 4 6 DVDdisplay DISC-l/2 indicators 5 PAUSE STOP Basic playback Preparations • When you want to view a disc. turn on the TV and select the video input connected to the DVD video player. • When you want to enjoy the sound of discs from the audio system, turn on the audio system and select the input connected to the DVD video player. 1 Press POWER, =_j° The DVD video player turns on and = the POWER indicator on the player [_ illuminates. When the DVD video player is turned on for the first time, an initial set-up display appears. See "Initial set-up" to make the settings before proceeding to step 2. sPerleescst DthISeCdiSscELyEoCuTwraenpt.eatedly to O,_SELEC,T_ _ Red (lit): The disc is on standby being played. Green (lit): Secondary standby. Off: Playback does not start. or is Press PLAY. °_ Playback stads. Pre0PsEts_/CLOOSEPEN/CLOSE (1/2). [] _ Press either button you want, -- The disc tray opens. 0PE_/CLOSE am 3 Place a disc on the disc tray. With the playback side down. Do not place more than one disc. • There are two different disc sizes. Place the disc in the correct guide on the disc tray. If the disc is out of the guide, it may damage the disc and cause the DVD video player to malfunction. • Do not place anything except DVD video discs, VIDEO CDs or audio CDs on the disc tray. PdirsecsstraOyP. EN/CLOSE (1/2) to close the O_E'_,C_OP_rEess the button which you pressed [] _ in step 2. :E',CLO_ETOset anotherdisc, press the other [] _ button. • Some discs may be automatically played after having been set. Even in the playback, you can select a disc to play in step 5. If you insert a DVD video disc that contains a title menu, a menu may appear. See "Locating a title using the title nema." [_ • You may need to press the TITLE or MENU button to display disc menu (depending on the actual DVD video disc.) Note Even while playing a disc, you can set another disc. Press the OPEN/CLOSE button for a disc which is not played • Initial set-up Make the following settings on the display. On-screen Language: Select the appropriate on-screen language. TV Shape: Select a picture size according to the aspect ratio of your TV. (See I_ for details.) Th_nk _ _r_ your 9_rc_a_ o[ h,s IOSH_ DVD P.3":e" ptease trek÷ e _election brC_ S¢,_*_,10ngucgea_d our_shoFe_lc 1 Press A / V to select "On-Screen Language," and press ENTER. 2 Select a language using • / •, and press ENTER 3 Press • to select "TV Shape," and press ENTER. 4 Select a picture size us=ng • / •. and press ENTER. 5 Finally press SETUP. All your selections are entered and the display disappears. To change your settings, see "Customizing the Function Settings." 120
-
 1
1 -
2
-
3
-
4
-
5
-
6
-
7
-
8
-
9
-
10
-
11
-
12
-
13
-
14
-
 15
15 -
 16
16 -
 17
17 -
 18
18 -
 19
19 -
 20
20 -
 21
21 -
 22
22 -
 23
23 -
 24
24 -
 25
25 -
26
-
27
-
28
-
29
-
30
-
31
-
32
-
33
-
34
-
35
-
36
-
37
-
38
-
39
-
40
-
41
-
42
-
43
-
44
-
45
-
46
-
47
-
48
 |
 |
