Toshiba SD-4960 User Manual - Page 6
Before Connecting the DVD Player, Connection to an, Audio System - manual
 |
View all Toshiba SD-4960 manuals
Add to My Manuals
Save this manual to your list of manuals |
Page 6 highlights
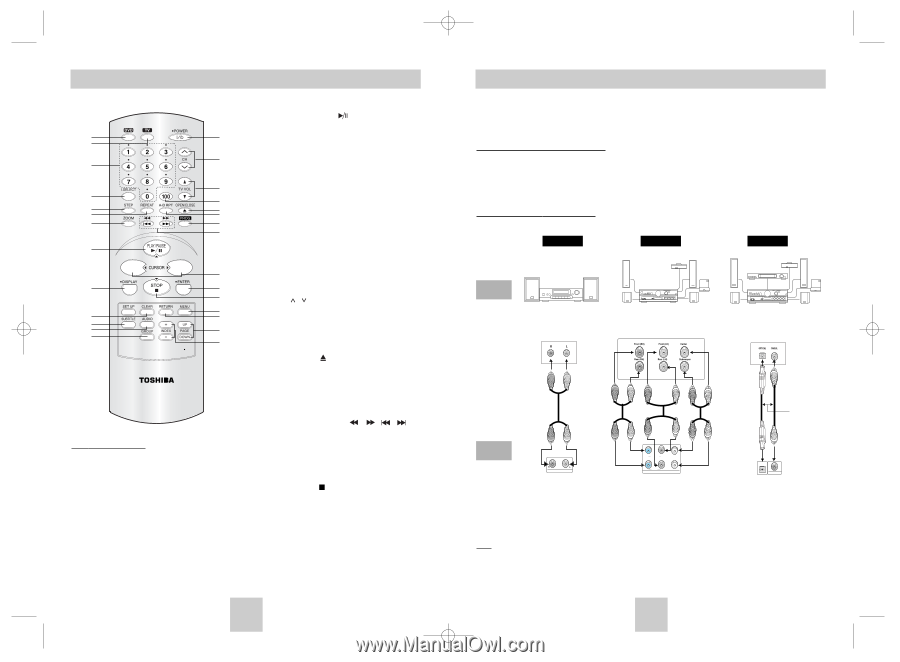
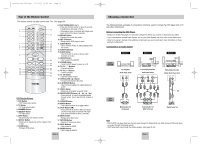
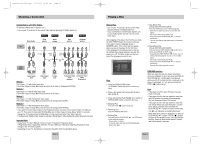
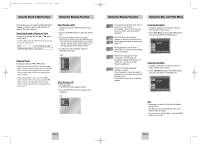
Toshiba-SD-4960(gb) 5/19/04 10:50 AM Page 10 Tour of the Remote Control This remote control can also control most TVs. See pages 34. 1 15 2 16 3 17 4 18 5 19 6 20 7 21 22 8 23 9 24 25 10 26 11 27 12 13 28 14 29 DVD Function Buttons 1. DVD Button • DVD mode select button. 2. TV Button • TV mode select button. 3. NUMBER Buttons 4. I.SELECT Button • TV input select. 5. STEP Button • Advances play one frame at a time. 6. REPEAT Button • Allows you to repeat play a title, chapter, track, or disc. 7. ZOOM Button • Enlarges DVD picture. 8. PLAY/PAUSE Button ( ) • Press and hold the button for about 2 seconds to begin/pause disc play in menu. • If play/pause dose not activate with single push, press and hold for about 2 seconds. 9. DISPLAY Button • Displays the current disc mode. 10. SET UP Button • Brings up the DVD player's menu. 11. CLEAR Button • Use to remove menus or status displays from the screen. 12. SUBTITLE Button 13. AUDIO Button • Use this button to access various audio functions on a disc. 14. GROUP Button • Use to select the GROUP. 15. POWER Button • Turns the DVD player's power on or off. 16. TV CH / Buttons • Channel selection. 17. TV VOL +/- Buttons • Control volumes. 18. TV 100 Button • Channel number button. 19. OPEN/CLOSE ( ) Button • To open and close the disc tray. 20. A-B REPEAT Button • Use to mark a segment to repeat between A and B. 21. PROG. Button • Allows you to program a specific order. 22. SEARCH/SKIP Buttons Press and hold to search forward/backward through a disc. Use to skip the title, chapter or track. 23. CURSOR Button 24. ENTER Button • This button functions as a toggle switch. 25. STOP Button ( ) • Press and hold the button in Menu for about 2 seconds.(If stop dose not activate with single push, press and hold for about 2 seconds.) 26. MENU Button • Brings up the Disc menu. 27. RETURN Button • Returns to a previous menu. 28. PAGE Buttons • Use to skip the PAGE. 29. INDEX Buttons • Use to skip the INDEX. ENG-10 Choosing a Connection The following shows examples of connections commonly used to connect the DVD player with a TV and other components. Before Connecting the DVD Player • Always turn off the DVD player, TV, and other components before you connect or disconnect any cables. • If you connected an external Audio System, turn on your Audio System and set it to the correct Audio Input. • Refer to the owner's manual of the additional components you are connecting for more information on those particular components. Connection to an Audio System Method 1 Method 2 Method 3 AUDIO SYSTEM 2ch Amplifier Audio Input Jacks 5.1ch Analog Amplifier Audio Input Jacks Dolby Digital Decoder Digital Audio Input Jack DVD Player MIXED AUDIO OUT Mixed Audio Out (2 Channel) R SURROUND L S/W R FRONT L CENTER ANALOG AUDIO OUT Analog Audio Out (Multi Channel) OR OPTICAL COAXIAL Digital Audio Out Note • DVD-AUDIO only plays back two channel audio through the Digital Audio out. Multi-channel DVD-Audio discs are output through the Analog outputs. • SACD plays back only through the Analog outputs. (See page 29~30) ENG-11
-
 1
1 -
 2
2 -
 3
3 -
 4
4 -
 5
5 -
 6
6 -
 7
7 -
 8
8 -
 9
9 -
 10
10 -
 11
11 -
 12
12 -
13
-
14
-
15
-
16
-
17
-
18
-
19
-
20
 |
 |