Toshiba SD-4960 User Manual - Page 7
Before Play, RESUME function, Connection to a TV For V
 |
View all Toshiba SD-4960 manuals
Add to My Manuals
Save this manual to your list of manuals |
Page 7 highlights
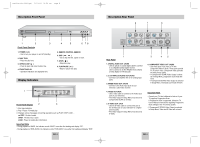
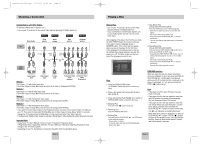
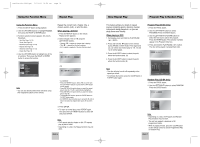
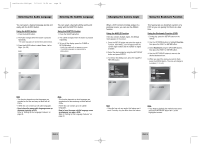
Toshiba-SD-4960(gb) 5/19/04 10:50 AM Page 12 Choosing a Connection Connection to a TV (For Video) TV (Normal, Widescreen, Projection, etc..) • Turn on your TV and set it to the correct Video Input by pressing TV/VIDEO button on. Basic Audio Method 1 Good picture Method 2 Better picture Method 3 Best picture Method 4 Optimum picture TV AV Cable S-Video Cable OR Video Cables OR DVD Player MIXED AUDIO OUT VIDEO OUT S-VIDEO OUT COMPONENT AUDIO OUT COMPONENT AUDIO OUT Audio Output Jacks Video Output Jack S-Video Jack Component Video Component Video Jacks Jacks (Interlace) (Progressive) Method 1 DVD Player + TV with Video Input Jack (The Video Output in Setup Menu must be set to the S-Video or Component(I-SCAN).) Method 2 DVD Player + TV with S-Video Input Jack (The Video Output in Setup Menu must be set to the S-Video.) Method 3 DVD Player + TV with Component Video Jacks (The Video Output in Setup Menu must be set to the Component(I-SCAN).) Method 4 DVD Player + TV with Progressive Scan Jacks. (The Video Output in Setup Menu must be set to the Component(P-SCAN).) • If you want to convert Video Output to the Progressive Scan, you have to first connect Video or S-Video on your TV. Then select Component(P-SCAN)(480p) out of Video Output in Setup Menu. Within 10 seconds, change the TV's external input to 525p(480p or Component) and select "Yes" (See Page 32). • If Component(P-SCAN) Video Output is selected in Setup Menu, Video(Composite) and S-Video will not work. Important Note • Consult your TV User's Manual to find out if your TV supports Progressive Scan. If Progressive Scan is supported, follow the TV User's Manual's instructions regarding Progressive Scan settings in the TV's menu system. • Depending on your TV, the Method of connection may differ from the illustration above. ENG-12 Playing a Disc Before Play • Turn on your TV and set it to the correct Video Input by pressing TV/VIDEO button on. • If you connected an external Audio System, turn on your Audio System and set it to the correct Audio Input. After plugging in the player, the first time you press the DVD POWER button, this screen comes up : If you want to select a language, press a NUMBER button. (This screen will only appear when you plug in the player for the first time.) If the language for the startup screen is not set, the settings may change whenever you turn the power on or off. Therefore, make sure that you select the language you want to use. Play 1. Press the OPEN/CLOSE button. The STANDBY indicator light goes out and the tray opens. 2. Place a disc gently into the tray with the disc's label facing up. 3. Press and hold the PLAY/PAUSE ( ) button or OPEN/CLOSE button to close the disc tray. 4. Stopping Play Press the STOP ( ) button during play. 5. Removing Disc Press the OPEN/CLOSE button. 6. Pausing Play Press and hold the PLAY/PAUSE ( ) or STEP button on the remote during play. - Screen stops, no sound. - To resume, press and hold the PLAY/PAUSE ( ) button once again. 7. Step Motion Play (Except CD/DVD-AUDIO/SACD) Press the STEP button on the remote during play. - Each time the button is pressed, a new frame will appear. - No sound is heard during STEP mode. - Press and hold the PLAY/PAUSE ( ) to resume normal play. (You can only perform step motion play in the forward direction.) 8. Slow Motion Play (Except CD/DVD-AUDIO/SACD) Press and hold the FWD SEARCH ( ) button on the remote during PAUSE or STEP mode. - By pressing the FWD SEARCH ( ) button, you can select slow motion play for 1/8, 1/4 or 1/2 of normal speed. - No sound is heard during slow mode. - Press and hold the PLAY/PAUSE ( ) to resume normal play. - Reverse slow motion play will not work. RESUME function When you stop disc play, the player remembers where you stopped, so when you press and hold the PLAY/PAUSE ( ) button again, it will pick up where you left off. (unless the disc is removed or the player is unplugged, or if you press and hold the STOP ( ) button twice.) Note • If the player is left for about 5 minutes in pause mode, it will stop. • If the player is left in the stop mode for more than about 30 minutes, the power will automatically shut off. (Automatic Power-Off Function) • If the player is left in the stop mode for more than one minute without any user interaction, a screen saver will be activated. Press and hold the PLAY/PAUSE ( ) button to resume normal play. • This icon indicates an invalid button press. • When OSD menu screen is displayed, our press of PLAY/PAUSE ( ) button or STOP ( ) buttom function as the Up/down cursor. It will only activate the Play, Pause or Stop function when it is press and hold for about 2 seconds. ENG-13
-
 1
1 -
 2
2 -
 3
3 -
 4
4 -
 5
5 -
 6
6 -
 7
7 -
 8
8 -
 9
9 -
 10
10 -
 11
11 -
 12
12 -
13
-
14
-
15
-
16
-
17
-
18
-
19
-
20
 |
 |
