Toshiba SD-6915 Instruction Manual - Page 6
Tour of the Remote Control, Description-Rear Panel - dvd audio
 |
View all Toshiba SD-6915 manuals
Add to My Manuals
Save this manual to your list of manuals |
Page 6 highlights
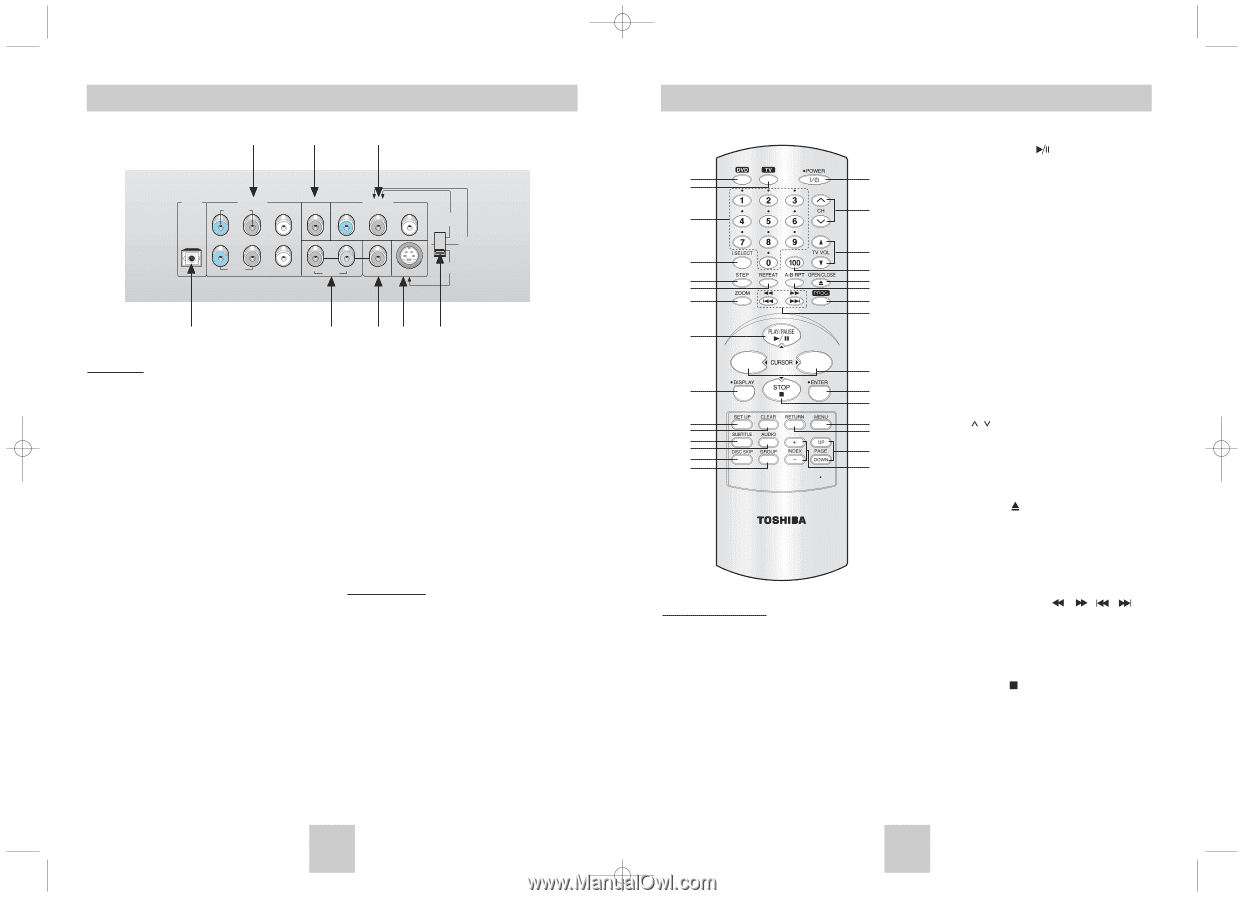
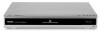
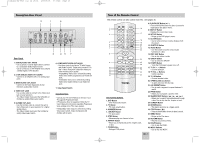
Toshiba-SD-6915 fix ok rev01 2004/6/04 07:30am Page 10 Description-Rear Panel 2 1 6 DIGITAL OUT AUDIO OUT SURROUND WOOFER COAXIAL VIDEO OUT Pr Pb Y OPTICAL R L S/W FRONT CENTER R AUDIO L VIDEO S-VIDEO 525p (480p) 525i (480i) S-VIDEO 1 3 45 7 Rear Panel 1. DIGITAL AUDIO OUT JACKS • Use a optical or coaxial digital cable to connect to a compatible Dolby Digital receiver. Use to connect to an A/V Amplifier that contains a Dolby Digital or DTS decoder. 2. 5.1CH ANALOG AUDIO OUT JACKS • Connect to an amplifier with 5.1ch analog input jacks. 3. MIXED AUDIO OUT JACKS • Connect to the Audio input jacks of your television, audio/video receiver. 4. VIDEO OUT JACK • Use a video cable to connect to the Video input jack on your television. • The Video Output must select the 525i(480i) or S-Video by setting Video select switch. 5. S-VIDEO OUT JACK • Use the S-Video cable to connect this jack to the S-Video jack on your television for a higher quality picture. • The Video Output must select the S-Video by setting Video select switch. 6. COMPONENT VIDEO OUT JACKS • Use these jacks if you have a TV with Component Video in jacks. These jacks provide Pr, Pb and Y video. Along with Component Video provides the best picture quality. • If 525p(480p) Video Out is selected by setting Video select switch progressive scan mode will work. • If 525i(480i) Video Out is selected by setting Video select switch interlace scan mode will work. 7. Video Select Switch Important Note • Consult your TV User's Manual to find out if your TV supports Progressive Scan. If Progressive Scan is supported, follow the TV User's Manual's instructions regarding Progressive Scan settings in the TV's menu system. • If 525p(480p) Video Output is selected by setting Video select switch, Video (Composite) and S-Video will not work. ENG-10 Tour of the Remote Control This remote control can also control most TVs. See pages 36. 1 16 2 17 3 18 4 19 5 20 6 21 7 22 23 8 24 9 25 26 10 27 11 28 12 13 29 14 15 30 DVD Function Buttons 1. DVD Button • DVD mode select button. 2. TV Button • TV mode select button. 3. NUMBER Buttons 4. I.SELECT Button • TV input select. 5. STEP Button • Advances play one frame at a time. 6. REPEAT Button • Allows you to repeat play a title, chapter, track, or disc. 7. ZOOM Button • Enlarges DVD picture. 8. PLAY/PAUSE Button ( ) • Press and hold the button for about 2 second to begin/pause disc play in menu. 9. DISPLAY Button • Displays the current disc mode. 10. SET UP Button • Brings up the DVD player's menu. 11. CLEAR Button • Use to remove menus or status displays from the screen. 12. SUBTITLE Button 13. AUDIO Button • Use this button to access various audio functions on a disc. 14. DISC SKIP Button • Use to skip a disc in order. 15. GROUP Button • Use to select the GROUP. 16. POWER Button • Turns the DVD player's power on or off. 17. TV CH / Buttons • Channel selection. 18. TV VOL +/- Buttons • Control volumes. 19. TV 100 button • Channel number button. 20. OPEN/CLOSE ( ) Button • To open and close the disc tray. 21. A-B REPEAT Button • Use to mark a segment to repeat between A and B. 22. PROG Button • Allows you to program a specific order. 23. SEARCH/SKIP Buttons Allows you to search forward/backward through a disc. Use to skip the title, chapter or track. 24. CURSOR Button 25. ENTER Button • This button functions as a toggle switch. 26. STOP Button ( ) • Press and hold the button in menu for about 2 second. 27. MENU Button • Brings up the Disc menu. 28. RETURN Button • Returns to a previous menu. 29. PAGE Buttons • Use to skip the PAGE. 30. INDEX Buttons • Use to skip the INDEX. ENG-11
-
 1
1 -
 2
2 -
 3
3 -
 4
4 -
 5
5 -
 6
6 -
 7
7 -
 8
8 -
 9
9 -
 10
10 -
 11
11 -
 12
12 -
13
-
14
-
15
-
16
-
17
-
18
-
19
-
20
-
21
 |
 |