Toshiba TLP-S40 User Manual - Page 10
Placement, Preparing and using the remote control - manual
 |
View all Toshiba TLP-S40 manuals
Add to My Manuals
Save this manual to your list of manuals |
Page 10 highlights
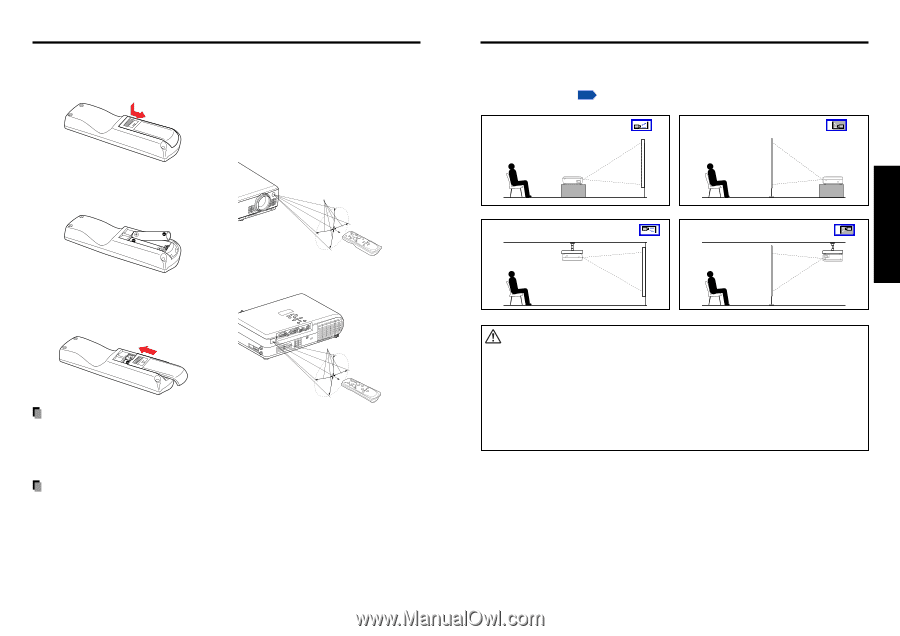
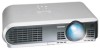
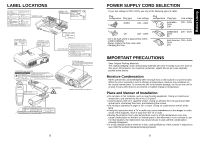
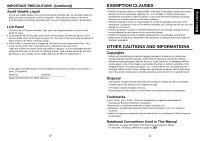
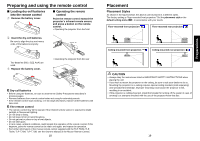
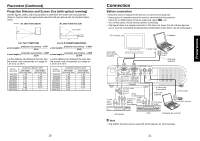
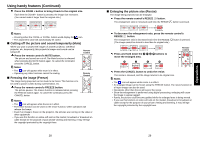
Preparing and using the remote control I Loading dry-cell batteries into the remote control q Remove the battery cover. I Operating the remote control Point the remote control toward the projector's infrared remote sensor, and press a button on the remote control. • Operating the projector from the front w Insert the dry-cell batteries. Be sure to align the plus and minus ends of the batteries properly. Approx. 15° Approx. 5m Two batteries (R03, SIZE AAA) are used. e Replace the battery cover. • Operating the projector from the rear Approx. 15° Approx. 5m Dry-cell batteries • Before using the batteries, be sure to observe the Safety Precautions described in previous pages. • Remove batteries from remote control when not using for extended periods. • If the remote control stops working, or if its range decreases, replace all the batteries with new ones. The remote control • The remote control may fail to operate if the infrared remote sensor is exposed to bright sunlight or fluorescent lighting. • Do not drop or bang. • Do not leave in hot or humid locations. • Do not get wet or place on top of wet objects. • Do not take apart. • In rare cases, ambient conditions could impede the operation of the remote control. If this happens, point the remote control at the main unit again, and repeat the operation. • For further information of the mouse remote control supplied with the TLP-T60M, TLP- T61M, TLP-T70M, TLP-T71M, see the Owner's Manual of the Mouse Remote Control. 18 Placement Placement Styles As shown in the figures below, this device can be placed in 4 different styles. The factory setting is "floor-mounted front projection." Set the placement style in the default setting menu p.32 , in accordance with your needs. Floor-mounted front projection Floor-mounted rear projection AC IN Ceiling-mounted front projection Ceiling-mounted rear projection AC IN CAUTION • Always obey the instructions listed in IMPORTANT SAFETY INSTRUCTIONS when placing the unit. • If you wish to mount the projector on the ceiling, be sure to ask your dealer to do so. Mounting the projector on a ceiling requires special ceiling brackets (sold separately) and specialized knowledge. Improper mounting could cause the projector to fall, resulting in an accident. • If the projector is ceiling-mounted, install the breaker for turning off the power in case of anomaly. Let everyone involved with the use of the projector know that.fact. 19 Preparations
-
 1
1 -
2
-
3
-
4
-
 5
5 -
 6
6 -
 7
7 -
 8
8 -
 9
9 -
 10
10 -
 11
11 -
 12
12 -
 13
13 -
 14
14 -
 15
15 -
16
-
17
-
18
-
19
-
20
-
21
-
22
-
23
-
24
-
25
-
26
 |
 |