Toshiba TLP-S40 User Manual - Page 16
Using the menus - features
 |
View all Toshiba TLP-S40 manuals
Add to My Manuals
Save this manual to your list of manuals |
Page 16 highlights
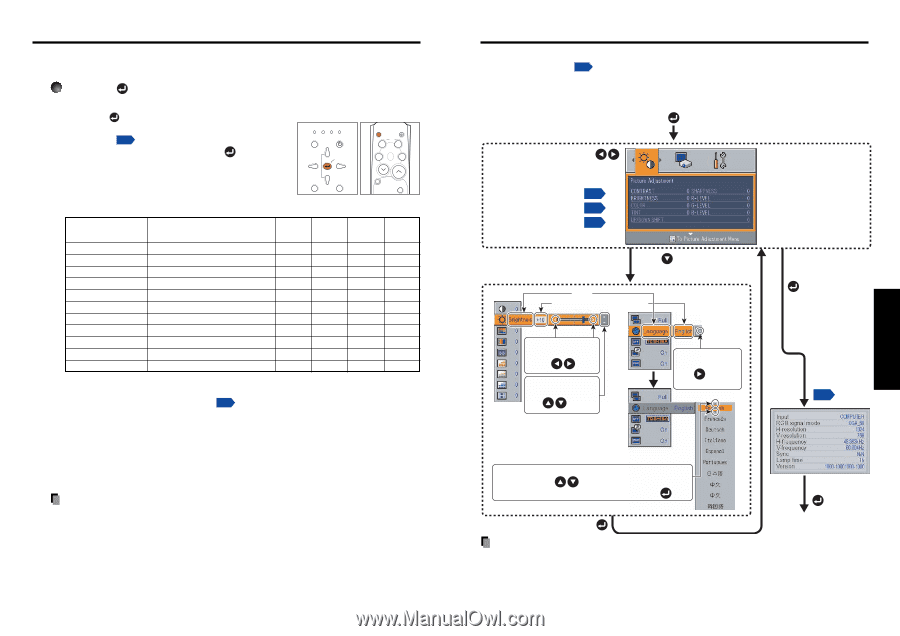
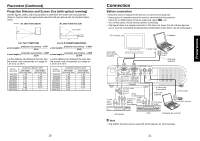
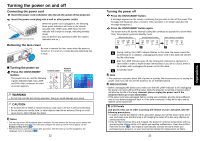
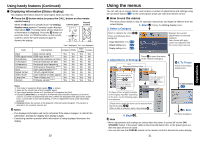
Using handy features (Continued) I Displaying Information [Status display] This displays information about the input signal, lamp use time, etc. Press the button twice (or press the CALL button on the remote control once). When the button is pressed once, the Setting Control panel Remote Control display menu appears. Pressing it again displays FAN TEMP LAMP ON CALL ON/ STANDBY information p.31 . The table below shows what kind of information is displayed. Press the button (or press the CALL or CANCEL button on the remote INPUT ON / STANDBY ZOOM + VOL. - MENU VOL. + KEYSTONE AUTO SET MUTE FREEZE RESIZE control to serve the same purpose) again to dismiss the display. AUTO KEYSTONE AUTO SET ZOOM - RESIZE OFF INPUT "Yes": displayed, "No": not displayed Item Description Computer Y/PB/PR Input Input source name Yes Yes RGB signal mode RGB input mode [Note 1] Yes No H-resolution Horizontal resolution (in bits) Yes No V-resolution Vertical resolution (in bits) Yes No H-frequency Horizontal sync frequency Yes No V-frequency Vertical sync frequency [Note 2] Yes No Sync Sync signal polarity [Note 3] Yes No Signal format Y/PB/PR signal format No Yes Video mode Color method of video signal No No Lamp time Time of lamp use [Note 4] Yes Yes Version Firmware version [Note 5] Yes Yes Video S-video Yes No No No No No No No Yes Yes Yes Camera Yes No No No No No No No No Yes Yes Notes 1: The mode of supported RGB signals p.46 is shown. 2: Same as the refresh rate of the computer signal. 3: Sync signal polarity shown as P (positive) or N (negative) for [H/V]. 4: Displays [Lamp time] as a measure of when the lamp should be replaced. (Cannot be used as a counter of guaranteed lamp time.) When the displayed time approaches 3,000 hours, consult with a store about getting a TLPLV2 replacement lamp (sold separately) prepared. 5: [Version] shows the version of the projector's internal control program. This version is referred to for customer service, etc. Notes • The displayed information will not be refreshed if the status changes. To refresh the information, dismiss the display, then display it again. • Conducting another operation while information is being displayed dismisses the display. 30 Using the menus You can call up on-screen menus, and conduct a number of adjustments and settings using the operation buttons p.16 on the control panel (main unit side) and remote control. I How to use the menus The menu shown below is only for operation instructions and might be different from the actual display. 1. Start Display the Setting display menu 2. Select a Category Select a category by using . There are following three categorys. Image adjustment menu p.32 Default setting menu p.32 Display setting menu p.33 Displays the current adjustments of selected category. Item shown with gray cannot be adjusted with the current input source. Press to open the menu 3. Adjustments & Settings of the selected category. Item Adjustment/Setting Value 5. To Finish Finish via the Status display menu. These marks signify the items can be adjusted/set by using . These marks signify an item can be switched by using . This mark signfy that there are options. Press to display a list of options. To Status display p.30 The figure shows a typical example. As the display may differ depending on the item, use the following pages as a reference. These marks signify the items can be selected from the list by using . After an item is selected, apply it by pressing . 6. End 4. Back The menu disappears. Note • Menu adjustments and settings are saved when the power is turned off via the ON/ STANDBY button. If the power cable is disconnected before this, or the power goes out, then the data will not be saved. • You can also use the CANCEL button on the remote control to dismiss the menu display. 31 Operations
-
 1
1 -
2
-
3
-
4
-
5
-
6
-
7
-
8
-
9
-
10
-
 11
11 -
 12
12 -
 13
13 -
 14
14 -
 15
15 -
 16
16 -
 17
17 -
 18
18 -
 19
19 -
 20
20 -
 21
21 -
22
-
23
-
24
-
25
-
26
 |
 |