Toshiba Tecra M11 PTME3C-05T02M Users Manual Canada; English - Page 148
Removing the battery pack, Power, Hard Disk Drive/Optical Disk Drive/eSATA
 |
View all Toshiba Tecra M11 PTME3C-05T02M manuals
Add to My Manuals
Save this manual to your list of manuals |
Page 148 highlights
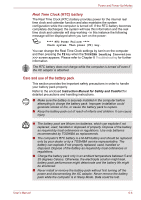
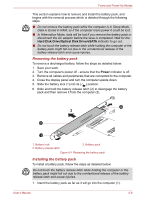
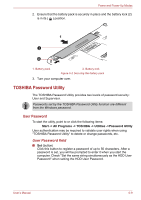
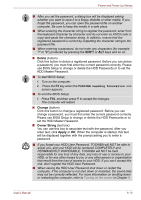
Power and Power-Up Modes This section explains how to remove and install the battery pack, and begins with the removal process which is detailed through the following steps. ■ Do not remove the battery pack while the computer is in Sleep Mode. Data is stored in RAM, so if the computer loses power it could be lost. ■ In Hibernation Mode, data will be lost if you remove the battery pack or disconnect the AC adaptor before the save is completed. Wait for the Hard Disk Drive/Optical Disk Drive/eSATA indicator to go out. ■ Do not touch the battery release latch while holding the computer or the battery pack might fall out due to the unintentional release of the battery release latch and cause injuries. Removing the battery pack To remove a discharged battery, follow the steps as detailed below: 1. Save your work. 2. Turn the computer's power off - ensure that the Power indicator is off. 3. Remove all cables and peripherals that are connected to the computer. 4. Close the display panel and turn the computer upside down. 5. Slide the battery lock (1) into its ( ) position. 6. Slide and hold the battery release latch (2) to disengage the battery pack and then remove it from the computer (3). 2 3 1 1. Battery lock 2. Battery release latch 3. Battery pack Figure 6-1 Releasing the battery pack Installing the battery pack To install a battery pack, follow the steps as detailed below: Do not touch the battery release latch while holding the computer or the battery pack might fall out due to the unintentional release of the battery release latch and cause injuries. 1. Insert the battery pack as far as it will go into the computer (1). User's Manual 6-8
-
 1
1 -
2
-
3
-
4
-
5
-
6
-
7
-
8
-
9
-
10
-
11
-
12
-
13
-
14
-
15
-
16
-
17
-
18
-
19
-
20
-
21
-
22
-
23
-
24
-
25
-
26
-
27
-
28
-
29
-
30
-
31
-
32
-
33
-
34
-
35
-
36
-
37
-
38
-
39
-
40
-
41
-
42
-
43
-
44
-
45
-
46
-
47
-
48
-
49
-
50
-
51
-
52
-
53
-
54
-
55
-
56
-
57
-
58
-
59
-
60
-
61
-
62
-
63
-
64
-
65
-
66
-
67
-
68
-
69
-
70
-
71
-
72
-
73
-
74
-
75
-
76
-
77
-
78
-
79
-
80
-
81
-
82
-
83
-
84
-
85
-
86
-
87
-
88
-
89
-
90
-
91
-
92
-
93
-
94
-
95
-
96
-
97
-
98
-
99
-
100
-
101
-
102
-
103
-
104
-
105
-
106
-
107
-
108
-
109
-
110
-
111
-
112
-
113
-
114
-
115
-
116
-
117
-
118
-
119
-
120
-
121
-
122
-
123
-
124
-
125
-
126
-
127
-
128
-
129
-
130
-
131
-
132
-
133
-
134
-
135
-
136
-
137
-
138
-
139
-
140
-
141
-
142
-
 143
143 -
 144
144 -
 145
145 -
 146
146 -
 147
147 -
 148
148 -
 149
149 -
 150
150 -
 151
151 -
 152
152 -
 153
153 -
154
-
155
-
156
-
157
-
158
-
159
-
160
-
161
-
162
-
163
-
164
-
165
-
166
-
167
-
168
-
169
-
170
-
171
-
172
-
173
-
174
-
175
-
176
-
177
-
178
-
179
-
180
-
181
-
182
-
183
-
184
-
185
-
186
-
187
-
188
-
189
-
190
-
191
-
192
-
193
-
194
-
195
-
196
-
197
-
198
-
199
-
200
-
201
-
202
-
203
-
204
-
205
-
206
-
207
-
208
-
209
-
210
-
211
-
212
-
213
-
214
 |
 |