Tripp Lite 9PXEBM180RT Eaton 9PX3K3U and 9PX EBM 180 V Installation and User M - Page 18
Connecting the internal battery
 |
View all Tripp Lite 9PXEBM180RT manuals
Add to My Manuals
Save this manual to your list of manuals |
Page 18 highlights
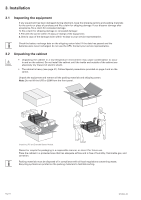
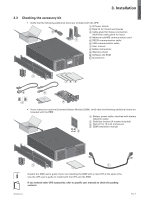
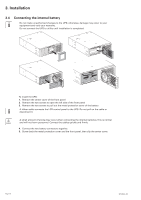
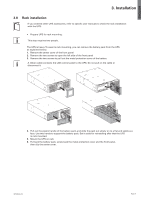
3. Installation 3.4 Connecting the internal battery Do not make unauthorized changes to the UPS; otherwise, damage may occur to your equipment and void your warranty. Do not connect the UPS to utility until installation is completed. To install the UPS: 1. Remove the center cover of the front panel 2. Remove the two screws to open the left side of the front panel 3. Remove the two screws to pull out the metal protection cover of the battery A ribbon cable connects the LCD control panel to the UPS. Do not pull on the cable or disconnect it. A small amount of arcing may occur when connecting the internal batteries. This is normal and will not harm personnel. Connect the cables quickly and firmly. 4. Connect the two battery connectors together. 5. Screw back the metal protection cover and the front panel, then clip the center cover. Page 18 9PX3K3U_EN
-
 1
1 -
2
-
3
-
4
-
5
-
6
-
7
-
8
-
9
-
10
-
11
-
12
-
 13
13 -
 14
14 -
 15
15 -
 16
16 -
 17
17 -
 18
18 -
 19
19 -
 20
20 -
 21
21 -
 22
22 -
 23
23 -
24
-
25
-
26
-
27
-
28
-
29
-
30
-
31
-
32
-
33
-
34
-
35
-
36
-
37
-
38
-
39
-
40
-
41
-
42
-
43
-
44
-
45
-
46
 |
 |
