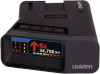
Uniden A1-R7 English Owner Manual - Page 23
Feature Details
 |
View all Uniden A1-R7 manuals
Add to My Manuals
Save this manual to your list of manuals |
Page 23 highlights
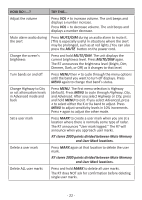
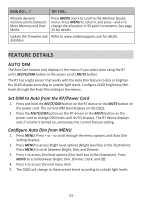
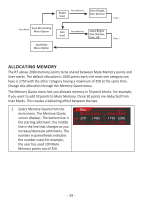
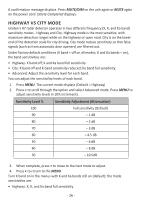
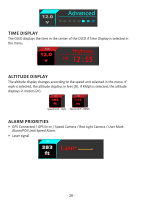
HOW DO I ...? TRY THIS... Allocate dynamic memory points between Mute Memory and User Marks Press MENU and + to scroll to the Memory Quota; menu. Press MENU to select it and press - and + to change the allocation in 50 point increments. See page 24 for details. Update the firmware and Refer to www.unidensupport.com for details. database FEATURE DETAILS AUTO DIM The Auto Dim feature only displays in the menus if you select Auto using the R7 unit's MUTE/DIM button or the power cord's MUTE button. The R7 has a light sensor that works with the Auto Dim feature to dim or brighten the OLED display according to outside light levels. Configure OLED brightness/dim levels through the Auto Dim setting in the menus. Set DIM to Auto from the R7/Power Cord 1. Press and hold the MUTE/DIM button on the R7 device or the MUTE button on the power cord. The current DIM level displays on the OLED. 2. Press the MUTE/DIM button on the R7 device or the MUTE button on the power cord to change DIM levels until AUTO displays. The R7 device displays and, if volume is turned on, announces the current feature setting. Configure Auto Dim from MENU 1. Press MENU. Press + or - to scroll through the menu options until Auto Dim Setting displays. 2. Press MENU to access Bright level options (Bright level box in the illustration). Press MENU to scroll between Bright, Dim, and Dimmer. 3. Press + to access Dim level options (Dim level box in the illustration). Press MENU to scroll between Bright, Dim, Dimmer, Dark, and Off. 4. Press + to access the next menu item 5. The OLED will change to these preset levels according to outside light levels. - 23 -
-
 1
1 -
2
-
3
-
4
-
5
-
6
-
7
-
8
-
9
-
10
-
11
-
12
-
13
-
14
-
15
-
16
-
17
-
 18
18 -
 19
19 -
 20
20 -
 21
21 -
 22
22 -
 23
23 -
 24
24 -
 25
25 -
 26
26 -
 27
27 -
 28
28 -
29
-
30
-
31
-
32
-
33
-
34
-
35
-
36
 |
 |
