Uniden BCT15 English Owners Manual - Page 35
Vehicle Installation, Mounting Using the Bracket
 |
View all Uniden BCT15 manuals
Add to My Manuals
Save this manual to your list of manuals |
Page 35 highlights
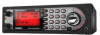
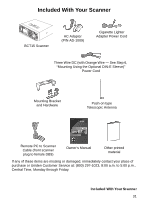
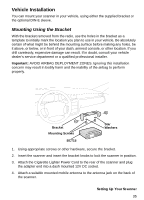
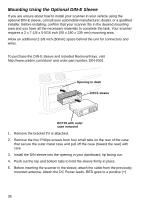
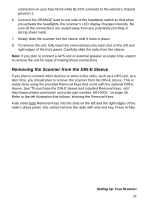
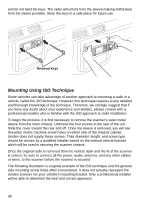
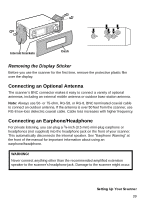
Vehicle Installation You can mount your scanner in your vehicle, using either the supplied bracket or the optional DIN-E sleeve. Mounting Using the Bracket With the bracket removed from the radio, use the holes in the bracket as a template to initially mark the location you plan to use in your vehicle. Be absolutely certain of what might be behind the mounting surface before making any holes, be it above, or below, or in front of your dash, armrest console, or other location. If you drill carelessly, expensive damage can result. If in doubt, consult your vehicle dealer's service department or a qualified professional installer. Important: AVOID AIRBAG DEPLOYMENT ZONES. Ignoring this installation concern may result in bodily harm and the inability of the airbag to perform properly. Bracket Mounting Screws BCT15 Star Washers 1. Using appropriate screws or other hardware, secure the bracket. 2. Insert the scanner and insert the bracket knobs to lock the scanner in position. 3. Attach the Cigarette Lighter Power Cord to the rear of the scanner and plug the adapter end into a dash mounted 12V DC socket. 4. Attach a suitable mounted mobile antenna to the antenna jack on the back of the scanner. Setting Up Your Scanner 35
-
 1
1 -
2
-
3
-
4
-
5
-
6
-
7
-
8
-
9
-
10
-
11
-
12
-
13
-
14
-
15
-
16
-
17
-
18
-
19
-
20
-
21
-
22
-
23
-
24
-
25
-
26
-
27
-
28
-
29
-
 30
30 -
 31
31 -
 32
32 -
 33
33 -
 34
34 -
 35
35 -
 36
36 -
 37
37 -
 38
38 -
 39
39 -
 40
40 -
41
-
42
-
43
-
44
-
45
-
46
-
47
-
48
-
49
-
50
-
51
-
52
-
53
-
54
-
55
-
56
-
57
-
58
-
59
-
60
-
61
-
62
-
63
-
64
-
65
-
66
-
67
-
68
-
69
-
70
-
71
-
72
-
73
-
74
-
75
-
76
-
77
-
78
-
79
-
80
-
81
-
82
-
83
-
84
-
85
-
86
-
87
-
88
-
89
-
90
-
91
-
92
-
93
-
94
-
95
-
96
-
97
-
98
-
99
-
100
-
101
-
102
-
103
-
104
-
105
-
106
-
107
-
108
-
109
-
110
-
111
-
112
-
113
-
114
-
115
-
116
-
117
-
118
-
119
-
120
-
121
-
122
-
123
-
124
-
125
-
126
-
127
-
128
-
129
-
130
-
131
-
132
-
133
-
134
-
135
-
136
-
137
-
138
-
139
-
140
-
141
-
142
-
143
-
144
-
145
-
146
-
147
-
148
-
149
-
150
-
151
-
152
 |
 |
