Uniden BCT15 English Owners Manual - Page 70
Viewing the Firmware Version and Electronic Serial Number, Initializing the Scanner’s Memory - programming software
 |
View all Uniden BCT15 manuals
Add to My Manuals
Save this manual to your list of manuals |
Page 70 highlights
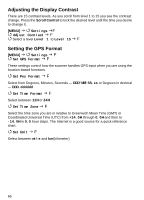
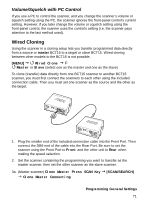
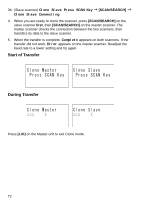
Viewing the Firmware Version and Electronic Serial Number To see the last Firmware Version, as well as the electronic serial number: [MENU] Settings F See Scanner Info F Firmware Version F The version number in the format X.XX.XX appears on the top line of the display while the serial number shown as SNXXXXXXXXXXXXXX appears at the bottom. Important: record the serial number in a secure place should you have a need to identify your scanner at some time. Press any key to return to the previous menu. Initializing the Scanner's Memory Follow these steps to clear the memory. Warning: This clears data you have entered. You cannot restore user programmed data that has been deleted. 1. To initialize the scanner's memory, turn off the scanner. 2. While pressing [2], [9], and [HOLD] at the same time, turn on power. At that point anything you have programmed is gone. Connecting Your Scanner to a Personal Computer You can use the supplied cable to connect your scanner to a personal computer to download data from the computer to the memory of the scanner or control the scanner's operation. Before you proceed, you must first set the scanner's communications speed as described in the "Setting the Serial Port Speed" section. In addition you will need a copy of Uniden Advanced Scanner Director software. You can download the software from http://www.uniden.com in the Customer Service downloads link. However, you must purchase an Unlocking Key from your Uniden dealer to unlock the software's full functionality. Important: Start with a high baud rate setting. If, during transfer, you get an error message, reduce the setting in the software and the scanner and start again until you get reliable, complete transfer of data. 70
-
 1
1 -
2
-
3
-
4
-
5
-
6
-
7
-
8
-
9
-
10
-
11
-
12
-
13
-
14
-
15
-
16
-
17
-
18
-
19
-
20
-
21
-
22
-
23
-
24
-
25
-
26
-
27
-
28
-
29
-
30
-
31
-
32
-
33
-
34
-
35
-
36
-
37
-
38
-
39
-
40
-
41
-
42
-
43
-
44
-
45
-
46
-
47
-
48
-
49
-
50
-
51
-
52
-
53
-
54
-
55
-
56
-
57
-
58
-
59
-
60
-
61
-
62
-
63
-
64
-
 65
65 -
 66
66 -
 67
67 -
 68
68 -
 69
69 -
 70
70 -
 71
71 -
 72
72 -
 73
73 -
 74
74 -
 75
75 -
76
-
77
-
78
-
79
-
80
-
81
-
82
-
83
-
84
-
85
-
86
-
87
-
88
-
89
-
90
-
91
-
92
-
93
-
94
-
95
-
96
-
97
-
98
-
99
-
100
-
101
-
102
-
103
-
104
-
105
-
106
-
107
-
108
-
109
-
110
-
111
-
112
-
113
-
114
-
115
-
116
-
117
-
118
-
119
-
120
-
121
-
122
-
123
-
124
-
125
-
126
-
127
-
128
-
129
-
130
-
131
-
132
-
133
-
134
-
135
-
136
-
137
-
138
-
139
-
140
-
141
-
142
-
143
-
144
-
145
-
146
-
147
-
148
-
149
-
150
-
151
-
152
 |
 |