Uniden MHS550 English Owners Manual - Page 22
Mounting the charger, Mounting on a flat surface, Mounting on a wall
 |
UPC - 050633500972
View all Uniden MHS550 manuals
Add to My Manuals
Save this manual to your list of manuals |
Page 22 highlights
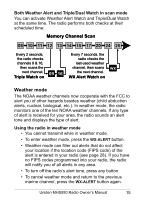
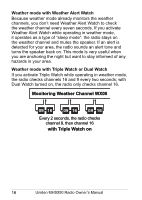
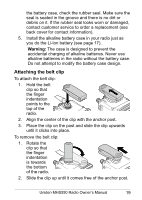
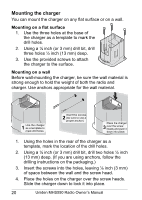
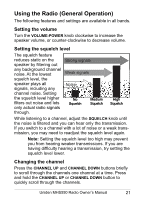
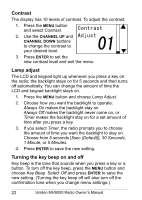
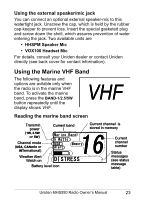
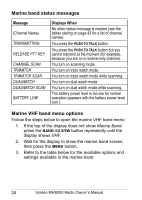
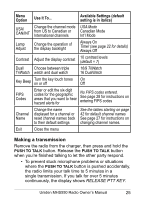
Mounting the charger You can mount the charger on any flat surface or on a wall. Mounting on a flat surface 1. Use the three holes at the base of the charger as a template to mark the drill holes. 2. Using a ⅛ inch (or 3 mm) drill bit, drill three holes ½ inch (13 mm) deep. 3. Use the provided screws to attach the charger to the surface. Mounting on a wall Before wall-mounting the charger, be sure the wall material is strong enough to hold the weight of both the radio and charger. Use anchors appropriate for the wall material. 1 Use the charger as a template to mark drill holes. Insert the screws 2 (be sure to use a proper anchor). Place the charger 3 over the screw heads and push it down into place. 1. Using the holes in the rear of the charger as a template, mark the location of the drill holes. 2. Using a ⅛ inch (or 3 mm) drill bit, drill two holes ½ inch (13 mm) deep. (If you are using anchors, follow the drilling instructions on the packaging.) 3. Insert the screws into the holes, leaving ⅛ inch (3 mm) of space between the wall and the screw head. 4. Place the holes on the charger over the screw heads. Slide the charger down to lock it into place. 20 Uniden MHS550 Radio Owner's Manual
-
 1
1 -
2
-
3
-
4
-
5
-
6
-
7
-
8
-
9
-
10
-
11
-
12
-
13
-
14
-
15
-
16
-
 17
17 -
 18
18 -
 19
19 -
 20
20 -
 21
21 -
 22
22 -
 23
23 -
 24
24 -
 25
25 -
 26
26 -
 27
27 -
28
-
29
-
30
-
31
-
32
-
33
-
34
-
35
-
36
-
37
-
38
-
39
-
40
-
41
-
42
-
43
-
44
-
45
-
46
-
47
-
48
-
49
-
50
-
51
-
52
-
53
-
54
-
55
-
56
 |
 |
