Vaddio AV Bridge MATRIX PRO RoboSHOT Cameras for the AV Bridge MATRIX PRO Manu - Page 18
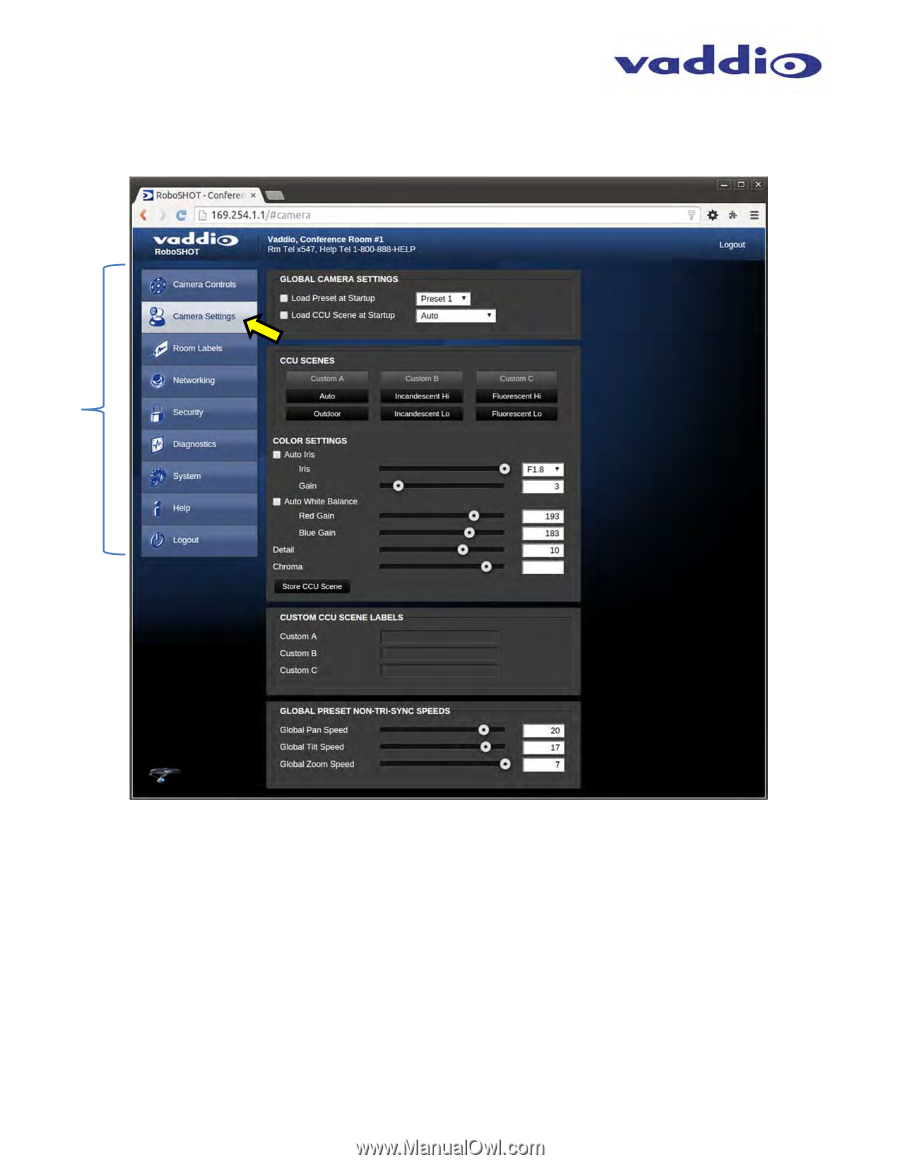
Load Preset at Startup, Load CCU Scene at Startup, CCU Scenes, Color Settings, Auto Iris Check Box
 |
View all Vaddio AV Bridge MATRIX PRO manuals
Add to My Manuals
Save this manual to your list of manuals |
Page 18 highlights
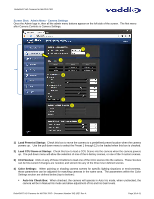
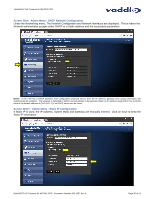
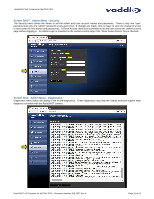
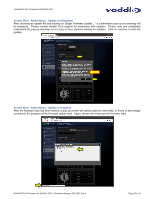
RoboSHOT HD Cameras for MATRIX PRO Screen Shot: Admin Menu - Camera Settings Once the Admin logs in, then all the admin menu buttons appear on the left side of the screen. The first menu after Camera Controls is Camera Settings. ➊ ➋ ➌ ➍ 3 ➎ ➏ ➐ 1) Load Preset at Startup: Check this box to move the camera to a predefined preset location when the camera powers up. Use the pull down menu to select the Preset 1 through 12 to be loaded when this box is checked. 2) Load CCU Scene at Startup: Check this box to load a CCU Scene into the camera when the camera powers up. The pull down menu will allow the selection of one of the 6-factory scenes, or one of the 3 custom scenes. 3) CCU Scenes: Click on any of these 9 buttons to load one of the CCU scenes into the camera. These Scenes can be fine-tuned if changes are needed, and stored into any of the three User defined scenes. 4) Color Settings: When painting or shading camera scenes for specific lighting situations or environments, these parameters can be adjusted for matching cameras in the same area. The parameters within the Color Settings section are defined below (top to bottom): Auto Iris Check Box: When checked, the camera will operate in Auto Iris mode, when unchecked, the camera will be in Manual Iris mode and allow adjustment of Iris and Iris Gain levels. RoboSHOT HD Cameras for MATRIX PRO - Document Number 342-1027 Rev A Page 18 of 41
-
 1
1 -
2
-
3
-
4
-
5
-
6
-
7
-
8
-
9
-
10
-
11
-
12
-
 13
13 -
 14
14 -
 15
15 -
 16
16 -
 17
17 -
 18
18 -
 19
19 -
 20
20 -
 21
21 -
 22
22 -
 23
23 -
24
-
25
-
26
-
27
-
28
-
29
-
30
-
31
-
32
-
33
-
34
-
35
-
36
-
37
-
38
-
39
-
40
-
41
 |
 |