Vaddio AV Bridge MATRIX PRO RoboSHOT Cameras for the AV Bridge MATRIX PRO Manu - Page 19
Auto White Balance check box
 |
View all Vaddio AV Bridge MATRIX PRO manuals
Add to My Manuals
Save this manual to your list of manuals |
Page 19 highlights
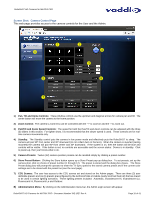
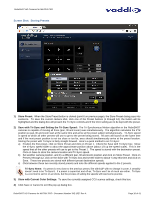
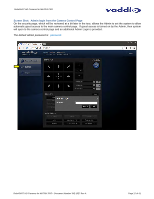
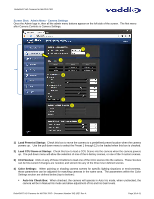
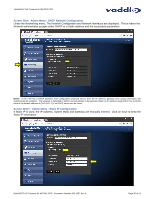
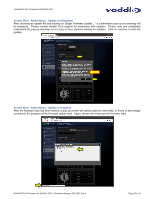
RoboSHOT HD Cameras for MATRIX PRO Iris: Move adjustment slider as required to adjust the iris opening. A numeric value will be displayed in the box to the right of the slider. Gain: Move adjustment slider as required for amount of iris gain desired. Numeric value will be displayed in the box to the right of the slider. Auto White Balance check box: When checked, camera will operate in Auto White Balance mode, when unchecked camera will be in Manual White Balance Mode and allow for adjustment of Red and Blue Gain. Red Gain: Move the adjustment slider as required for amount of Red Gain desired. A numeric value will be displayed in the box to the right of the slider. Blue Gain: Move the adjustment slider as required for amount of Blue Gain desired. Numeric value will be displayed in the box to the right of the slider. Back Light Compensation: When checked, Back Light Compensation will be applied to the camera if camera is in Auto White Balance mode. Detail: Move the adjustment slider as required for amount of detail (Aperture) desired. A numeric value will be displayed in the box to the right of the slider. Note: If the detail is too high, the video can look grainy and appear noisy too. Chroma: Move the adjustment slider as required for the amount of Chroma (Color Vibrancy) desired. A numeric value will be displayed in the box to the right of the slider. 5) Store CCU Scene button: Once the desired scene adjustments have been made, this button will activate a pop-up menu that can be used to store this scene into one of the three User Defined Scene locations. These User Defined Scenes can be named as required for clarity. These User Defined CCU Scenes can be adjusted and re-saved at any time. 6) Custom CCU Scene Labels: The labels for the (3) User Defined customizable Scenes can be changed as needed. Mouse the cursor into the appropriate window and edit the text. Press Save to store these changes or press Cancel to exit this window. 7) Global Preset Non-Tri-Sync Speeds: When Tri-Sync Presets are not being used, then this section governs the pan, tilt and zoom speeds between the camera presets. These will be defaulted to a nominal level, but can be tailored to most any application. Screen Shot: Admin Menu - Room Labels The Room Labels menu allows the Admin to label the company name, room name, room phone and help phone on a per RoboSHOT basis. The labels appear on every page at the top/middle of the page. Simply enter the room information and click Save. RoboSHOT HD Cameras for MATRIX PRO - Document Number 342-1027 Rev A Page 19 of 41
-
 1
1 -
2
-
3
-
4
-
5
-
6
-
7
-
8
-
9
-
10
-
11
-
12
-
13
-
 14
14 -
 15
15 -
 16
16 -
 17
17 -
 18
18 -
 19
19 -
 20
20 -
 21
21 -
 22
22 -
 23
23 -
 24
24 -
25
-
26
-
27
-
28
-
29
-
30
-
31
-
32
-
33
-
34
-
35
-
36
-
37
-
38
-
39
-
40
-
41
 |
 |
