Vantec UGT-MST644R User Guide - Page 6
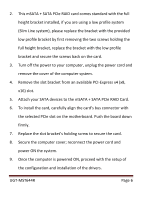
Attach your SATA devices to the mSATA + SATA PCIe RAID Card.
 |
View all Vantec UGT-MST644R manuals
Add to My Manuals
Save this manual to your list of manuals |
Page 6 highlights
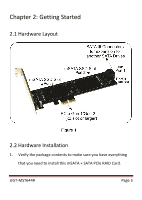
2. This mSATA + SATA PCIe RAID card comes standard with the full height bracket installed, if you are using a low profile system (Slim Line system), please replace the bracket with the provided low profile bracket by first removing the two screws holding the full height bracket, replace the bracket with the low profile bracket and secure the screws back on the card. 3. Turn off the power to your computer, unplug the power cord and remove the cover of the computer system. 4. Remove the slot bracket from an available PCI-Express x4 (x8, x16) slot. 5. Attach your SATA devices to the mSATA + SATA PCIe RAID Card. 6. To install the card, carefully align the card's bus connector with the selected PCIe slot on the motherboard. Push the board down firmly. 7. Replace the slot bracket's holding screw to secure the card. 8. Secure the computer cover; reconnect the power cord and power ON the system. 9. Once the computer is powered ON, proceed with the setup of the configuration and installation of the drivers. UGT-MST644R Page 6
-
 1
1 -
 2
2 -
 3
3 -
 4
4 -
 5
5 -
 6
6 -
 7
7 -
 8
8 -
 9
9 -
 10
10 -
 11
11 -
 12
12 -
13
-
14
-
15
-
16
-
17
-
18
-
19
-
20
-
21
 |
 |
