ViewSonic PJD5553LWS PJD5553Lws User Guide English - Page 54
Using the dust filter (optional accessory), optional accessory
 |
View all ViewSonic PJD5553LWS manuals
Add to My Manuals
Save this manual to your list of manuals |
Page 54 highlights
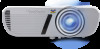
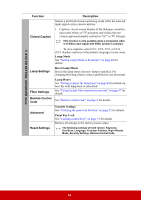
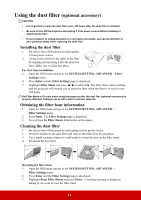
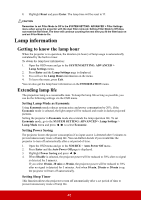
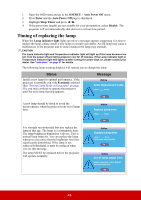
Using the dust filter (optional accessory) CAUTION • It is important to clean the dust filter every 100 hours after the dust filter is installed. • Be sure to turn off the projector and unplug it from power source before installing or detaching the filter. • If your projector is ceiling-mounted or is not easily accessible, pay special attention to your personal safety when replacing the dust filter. Installing the dust filter 1. Be sure to turn off the projector and unplug it from power source. 2. As the arrows shown to the right, fit the filter by aligning and inserting it into the projector slots. Make sure it clicks into place. For first time installation: 3. Open the OSD menu and go to the SYSTEM SETTING: ADVANCED > Filter Settings menu. 4. Press Enter and the Filter Settings page is displayed. 5. Highlight Filter Mode and press / to select On. The filter timer starts counting and the projector will remind you to clean the filter when the filter is in use for over 100 hours. Set Filter Mode to On only when using the projector after the dust filer (optional accessory) is properly attached. Failing to do so will result in a shorter lamp life. Obtaining the filter hour information 1. Open the OSD menu and go to the SYSTEM SETTING: ADVANCED > Filter Settings menu. 2. Press Enter. The Filter Settings page is displayed. 3. You will see the Filter Hours information on the menu. Cleaning the dust filter 1. Be sure to turn off the projector and unplug it from power source. 2. Press the latches on the dust filter and remove the filter from the projector. 3. Use a small vacuum cleaner or a soft brush to sweep the dust on the filter away. 4. Re-install the dust filter. Resetting the filter timer 5. Open the OSD menu and go to the SYSTEM SETTING: ADVANCED > Filter Settings menu. 6. Press Enter and the Filter Settings page is displayed. 7. Highlight Reset Filter Hours and press Enter. A warning message is displayed asking if you want to reset the filter timer. 47
-
 1
1 -
2
-
3
-
4
-
5
-
6
-
7
-
8
-
9
-
10
-
11
-
12
-
13
-
14
-
15
-
16
-
17
-
18
-
19
-
20
-
21
-
22
-
23
-
24
-
25
-
26
-
27
-
28
-
29
-
30
-
31
-
32
-
33
-
34
-
35
-
36
-
37
-
38
-
39
-
40
-
41
-
42
-
43
-
44
-
45
-
46
-
47
-
48
-
 49
49 -
 50
50 -
 51
51 -
 52
52 -
 53
53 -
 54
54 -
 55
55 -
 56
56 -
 57
57 -
 58
58 -
 59
59 -
60
-
61
-
62
-
63
-
64
-
65
-
66
-
67
-
68
-
69
-
70
-
71
-
72
-
73
-
74
-
75
-
76
-
77
-
78
-
79
-
80
-
81
-
82
-
83
-
84
 |
 |