ViewSonic VT2430 User Guide - Page 30
ViewSonic, Storing Channels into Memory, Viewing the Menus - button locked
 |
UPC - 766907329711
View all ViewSonic VT2430 manuals
Add to My Manuals
Save this manual to your list of manuals |
Page 30 highlights
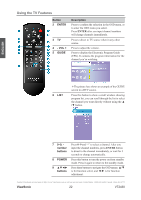
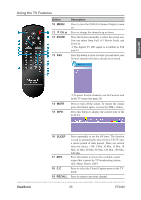
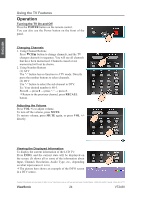
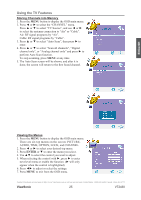
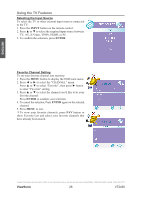
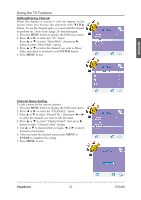
Using the TV Features Storing Channels into Memory 1. Press the MENU button to display the OSD main menu. 2. Press ◄ or ► to select the "CHANNEL" menu. Press ▲ or ▼ to select "TV Source", and use ◄ or ► to select the antenna connection to "Air" or "Cable". Air: RF signal programs by "Air". Cable: RF signal programs by "Cable". 3. Press ▲ or ▼ to select "Auto Scan", then press ► to enter. 4. Press ▲ or ▼ to select "Scan all channels", "Digital channel only", or "Analog channel only" and press ► to perform Auto Scan function. To stop scanning, press MENU at any time. 5. The Auto Scan screen will be shown, and after it is done, the screen will return to the first found channel. ENGLISH Viewing the Menus 1. Press the MENU button to display the OSD main menu. There are six top menus on the screen: PICTURE, AUDIO, TIME, OPTION, LOCK, and CHANNEL. 2. Press ◄ or ► to select your desired top menu. 3. Press ENTER or ▼ to enter the menu you select. 4. Use ▲▼ to select the control you want to adjust. 5. When selecting the control with ►, press ► to enter next level menu or enable the function. (► will only appear when the control is highlighted) 6. Press ◄► to adjust or select the settings. 7. Press MENU to exit from the OSD menu. Contact ViewSonic service team at: http://www.ViewSonic.com or call our service team: United States 1-800-688-6688, Canada 1-866-463-4775 ViewSonic 25 VT2430
-
 1
1 -
2
-
3
-
4
-
5
-
6
-
7
-
8
-
9
-
10
-
11
-
12
-
13
-
14
-
15
-
16
-
17
-
18
-
19
-
20
-
21
-
22
-
23
-
24
-
 25
25 -
 26
26 -
 27
27 -
 28
28 -
 29
29 -
 30
30 -
 31
31 -
 32
32 -
 33
33 -
 34
34 -
 35
35 -
36
-
37
-
38
-
39
-
40
-
41
-
42
-
43
-
44
-
45
-
46
-
47
 |
 |
